
Mikrotik PPPoE is one of the means deployed by internet service providers to deliver internet access to diverse customers while ensuring that security at the access layer is guaranteed. With PPPoE, ISPs can deliver highly optimized, easy to deploy last-mile connectedness with user authentication system that ensures that only authorized users are allowed access to the ISP network.
Mikrotik PPPoE setup makes it easy to deliver high-bandwidth links to customers using low-cost routeros devices that can be deployed in PPPoE server and client modes for quick circuit provisioning. In this article, we go through the Mikrotik PPPoE server and client setup, test, and confirm system operability. The solution will be implemented on routeros running on the GNS3 platform.
Read: Getting Mikrotik 10G devices for less
Mikrotik PPPoE Server configuration
On the server side of the solution, four things have to be configured, assuming that your Mikrotik router has been assigned both WAN and LAN ip addresses. The steps are : the PPPoE pool, PPPoE profile, PPPoE secrete and the PPPoE server enabling. Let’s work through them in the steps below.
/ip pool add name=PPPoE_Pool1 ranges=192.168.10.1-192.168.20.3
/ppp profile add name=PPPoE local-address=192.168.10.1 remote-address=PPPoE dns-server=8.8.8.8
/ppp secret add name=user1 password=PPPoE@user1 service=pppoe profile=PPPoE
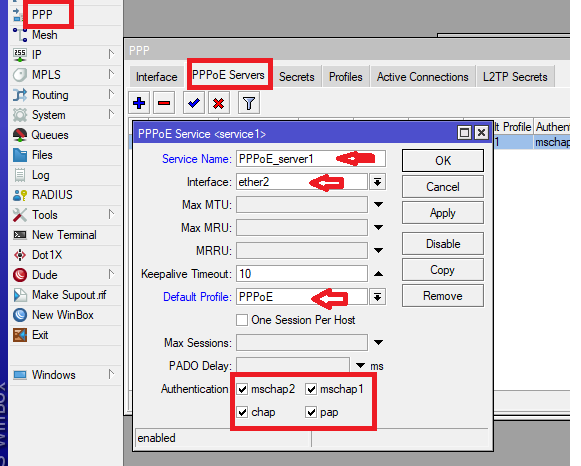
Enable PPPoE Server
Now that server parameters have been configured, it is time to enable PPPoE server. This can be done via GUI as captured in the image below.
Now that the server side is all setup, it is time to configure the Mikrotik PPPoE client device. It is as simple is accessing your Mikrotik router and enabling PPPoE client on the interface connecting to the ISP device. See guide in the image below.
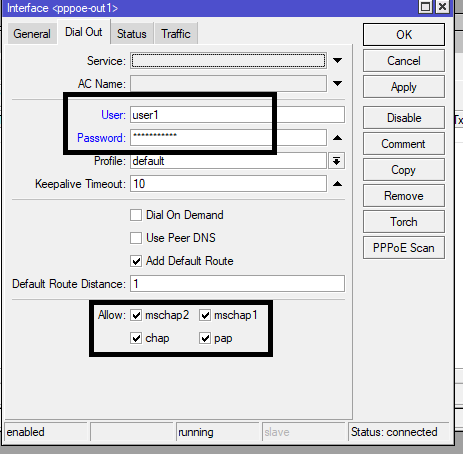
Mikrotik PPPoE Client configuration
Enabled on the WAN interface of the customer’s Mikrotik router, the router must not have an IP address configured on the WAN port. See config in the image below.
/interface pppoe-client add user=user1 password=PPPoE@user1 interface=ether1
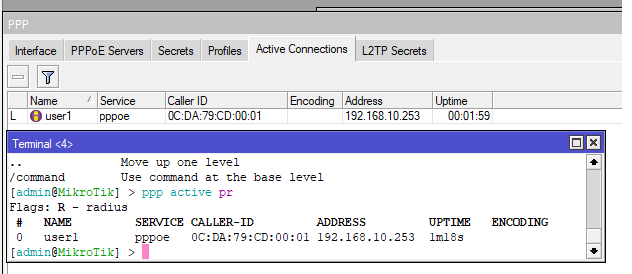
Check connected users
To see all connected PPPoE clients, simply click on the “active connections” tab in the PPP menu or type “ppp active print” into the terminal. Below image shows the active user(s).
You may also like: Using Mikrotik EOIP to connect multiple branch offices to the HQ
If you enjoyed this tutorial, please subscribe to this blog to receive my posts via email. Also subscribe to my YouTube channel, like my Facebook page and follow me on Twitter.