
Mikrotik ipsec l2tp vpn allows routeros network administrators to provide remote access login to internal networks for roaming users. The feature can be configured together with ipsec to secure communications between users and the vpn server. However, recent routeros upgrades have brought about a minor change to how mrotik ipsec l2tp vpn is configured. In this post, we will look at how to configure Mikrotik l2tp vpn with ipsec on routeros version 6.43.2.
In my earlier post titles: “Very easy way to configure Mikrotik L2tp VPN for remote clients”, I talked about how to configure mikrotik l2tp vpn with ipsec for Mikrotik routers with earlier versions of Routeros. If you are running the current, version of Routeros, there is a slight change to how ipsec is configured to work with l2tp vpn, and addressing that change is the objective of this post.
Requirements
Before configuring Mikrotik ipsec l2tp vpn on the router, ensure that the following conditions are met.
1 The router has at least one public IP address that is reachable from the internet.
2 The router has been configured with internet access.
3 There is no firewall filter rules blocking udp ports 500, 1701, and 4500.
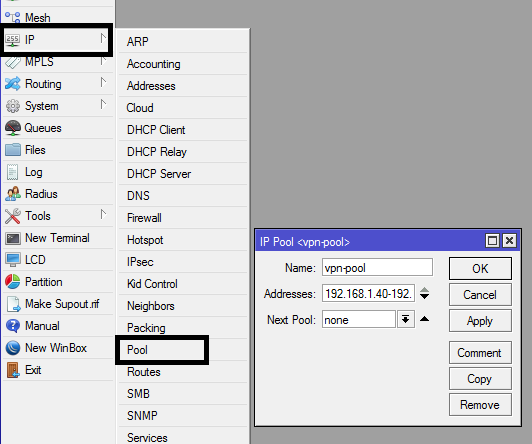
Configure IP pool for vpn users
The first thing to do is to create a pool for vpn users. This can be a pool of IP addresses from your internal network. These IP addresses must have been excluded from your dhcp pool configured for LAN users. For example, if your internal network is configured for 192.168.1.0/24, you can exclude from 10 to 40. The excluded IP range can then be used for your vpn pool.
Configure PPP profile to use vpn pool
In the PPP sub-menu, click on profile, double-click on the default profile and edit as shown in the image below.

The 192.168.1.3 IP is the address configured on the router’s LAN port while 192.18.1.4 is a local dns server. The absence of a local dns server, use a public dns server, e.g 8.8.8.8.
Read: Five common mistakes that every Mikrotik routerOS user should avoid
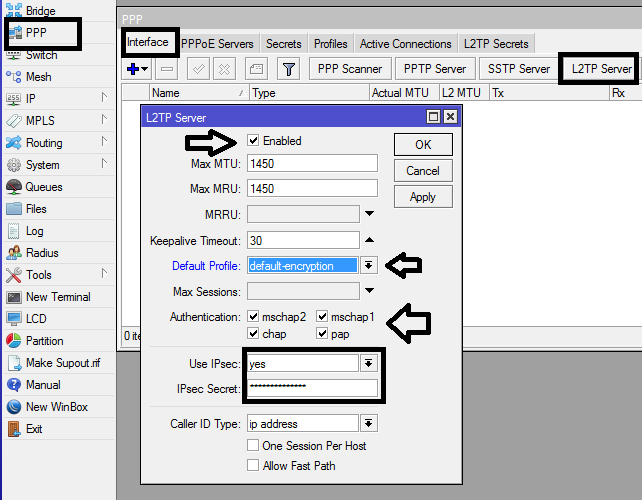
Enabling l2tp server on Mikrotik router
The next step is to enable l2tp server on the Mikrotik router that will serve as your vpn server. To do this, simply click on PPP>>l2tp server and check the box to enable it. Make sure to choose the profile created/edited in the step above and note the ipsec secret entered because it will be required when setting up ipsec. See image below for guide.
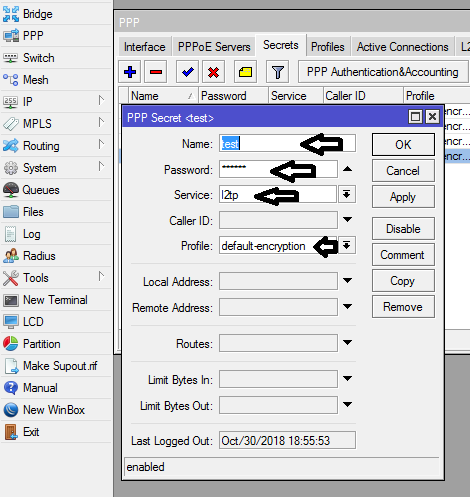
Create PPP secrete for users to login to the vpn server
Here, you will create username and passwords for remote users to login to the vpn server. In the ppp sub-menu, click on secret and enter usernames and passwords for as many users as you want to have vpn access. See image below.
Enabling ipsec for l2tp vpn
Because the l2tp server has been configured to use ipsec, we need to enable ipsec on the router and link it with the l2tp server to ensure that all l2tp vpn connections are secured. This section is where Mikrotik has made a slight change for routers running the current version of Routeros.
In previous versions of Routeros, we had no peer profile. All that was required was for us to configure ipsec peer and policy proposal. With current Routeros version, we need to configure peer profile; what was previously a part of ipsec peer. See images below for how to configure ipsec peer and peer profile
Set ipsec peer profile
In the ipsec section, first, create a peer profile that will be used to create an ipsec peer. Choose your preferred authentication and encryption protocols. See image below:

Cofigure Ipsec peer
After configuring ipsec peer profile, the next is to configure ipsec peer. The ipsec peer will make use of the peer profile created above. See image below for guide.
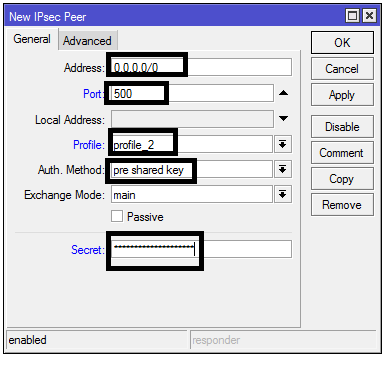
Address of all zeros means vpn connection from any source IP is allowed, profile2 is selected because I created it in the previous step, while the ipsec secret entered is same as the ipsec secret key entered when l2tp server was eabled in step 3.
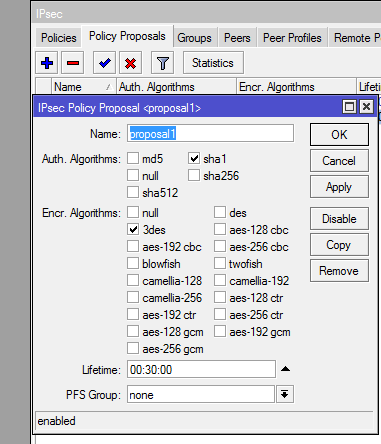
Create an ipsec proposal
The final step is the creation of a matching ipsec proposal. The proposal must use the same authentication and encryption feature configured on ipsec peer profile. See the image below for guide.
That’s all you need to set up Mikrotik ipsec l2tp vpn. Go to your computers, phones and tablet and connect to the vpn server using the public IP configured on the mikrotik router.
If you enjoyed this tutorial, please subscribe to this blog to receive my posts via email. Also subscibe to my YouTube channel, like my Facebook page and follow me on Twitter.
Good afternoon.
In the company I work for, an L2TP / IPsec VPN is set up.
I can connect to vpn and work normally.
A co-worker was at my house to do an activity connected to the company’s environment via VPN.
It was not possible to make a remote remote connection. My computer connected the VPN, when my colleague’s computer connected the VPN, it dropped my connection. If I have to connect again, it drops my colleague’s connection. What can this be?
Configuratiom L2TP
Authentication = Select all
USE IPsec = Yes
Caller ID Type = Number
Thank you very much
L2tp does not allow connections from multiple devices with the same source IP addresses. I assume you are both sharing the same hotspot and as such, making use of same public IP address.
Timigate, Good Morning.
Thank you very much.