
Mikrotik command line interface accessible via the new the console, the terminal window in routerOS or through a terminal emulator like telnet or ssh, is one of the few features most Mikrotik users like to make use of. Thanks to the easy-to-use graphical interface available in winbox.
Experience has shown that there are times when a router can not be accessed via winbox, either as a result of configured firewll rules, routing proplem or poor connections over a wireless link. In such situations, the user can make use of telnet or ssh to access the router. But what can you do in such situation if you have no basic knowledge of the Mikrotik command line interface? In this post, we will look at the simplest way to understand the Mikrotik command line interface.
In addiction to providing a secured access mode to the router via ssh, the Mikrotik command lind interface also speeds up configuration time on Mikrotik routers and makes it easy to replicate configurations on other Mikriotik routers by copying and pasting configuration commands.
How to understand the Mikrotik command line interface.
Though there are limited information on Mikrotik command line, as most users prefer the easy way through Winbox, understanding how to use the Mikrotik command line is quite simple. Using the Winbox can infact teach one how to make use of the command line interface. The steps taken to accomplish a task through the Winbox GUI, can also be taken when entering commands in the CLI. For Example, to assign an IP address to ether1 via the GUI will involve the following steps highlighted in the image below.
Assigning IP addresses

The same task can be done using the Mikrotik command line by simply following the steps highlighted in the image above. See the command line equivalent below.
/ip address add address=192.168.11.1/24 interfce=ether1. Simple! The Mikrotik command line version comes shorter and faster with steps 1 to 5 used.
Lets see another example -adding a default route.
Configuring default/static routes

Following the steps highlighted in the image above, the Mikrotik command line equivalent for achieving same task is given below
ip route add dst-address=0.0.0.0/0 gateway=10.0.0.10. Just like the first example, this one contains five out of the seven steps highlighted in the GUI version. We achieve the CLI version by following the steps in the GUI version, excluding “apply” and “okay”.
You may also like: How to secure Mikrotik routers by blocking port access from the internet
To configure a static route to a destination network, we simple change the destination address from 0.0.0.0/0 to the network address we are trying to access, e.g, 192.168.88.0/24. See below.
/ip route add dst-address=192.168.88.0/24 gateway=10.0.0.10.
Let’s see an example of how to configure NAT rules on Mikrotik, using the GUI and CLI versions .
Configuring NAT on Mikrotik
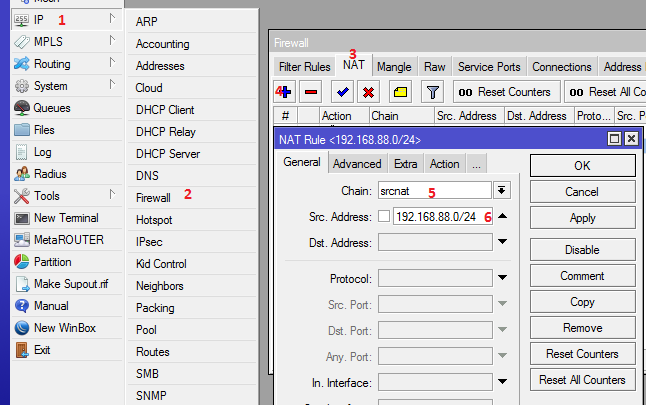

The CLI version is given below.
/ip firewall nat add chain=srcnat src-address=192.168.88.0/24 action=masquerade. Very simple and easy!
If you enjoyed this tutorial, please subscribe to this blog to receive my posts via email. Also subscribe to my YouTube channel, like my Facebook page and follow me on Twitter.
To learn more about Mikrotik command line interface, please go to https://wiki.mikrotik.com/wiki/Manual:Console
Lovely! Keep it coming
Thank you Yelutide.
This page is good commend i’ll note. thanks for share your idea.
thanks so much this CLI have been very helpful for me.