
I have thought about these two terms
extensively and even though the difference is quite clear to me, there are lots
of users out there that do not know the difference between these two terms as
well as how they are configured on a Mikrotik router. In this piece, I will be
explaining what each term means, why we need to set it up and how.
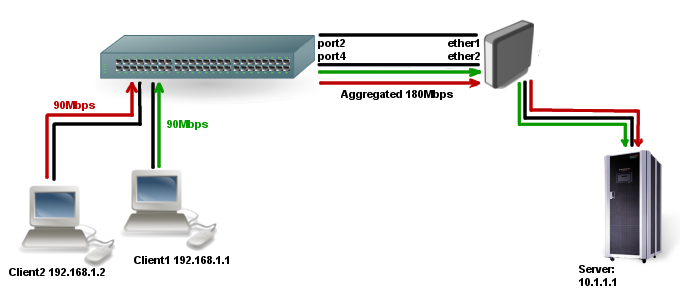
First, I
will start with bonding. Bonding in Mikrotik, like etherchannel bonding in
Cisco, is used to aggregate two interfaces together to create a new virtual
interface with the combined capacity of the two bonded interfaces. It is mainly
used for connection between two devices and provides some form of reliability by
making sure that the connection stays up as long as there is at least one
active interface on both connected devices.

Setting
up bonding on a Mikrotik routers.
up bonding on a Mikrotik routers.
On
router 1, click new terminal, copy, edit and paste below codes. Make sure the
interfaces match the ones connecting to router 2. There must be two cables
connecting to the two bonded ports on router
router 1, click new terminal, copy, edit and paste below codes. Make sure the
interfaces match the ones connecting to router 2. There must be two cables
connecting to the two bonded ports on router
2.
[admin@Router
1] > int bonding add slaves=ether4,ether5
1] > int bonding add slaves=ether4,ether5
Next,
assign an IP address to the bonded interface. See below:
assign an IP address to the bonded interface. See below:
Still
in the new terminal window, copy, edit and paste the codes below:
in the new terminal window, copy, edit and paste the codes below:
[admin@Router1]
ip address> add address=192.168.1.1/24
interface=bonding1
ip address> add address=192.168.1.1/24
interface=bonding1
If
you have more than one interface bonding, be sure to choose the correct one.
Repeat the two steps explained above on router 2, make sure the two cables are
well connected,e.g, port 4 on router 1 to port 4 on router 2 and port 5 on
router 1 to port 5 on router 2. Ping across and it should be successful. If
each of the ports is 100Mbps, the connection between both routers should have a
combined capacity of 200Mbps.
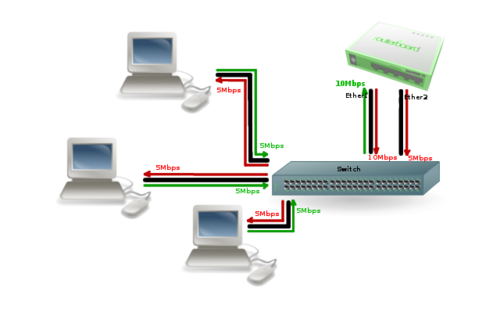
Bonded
interfaces can also be connected to a switch as shown in the image below. In this case you will need to configure etherchannel bonding on the switch.
interfaces can also be connected to a switch as shown in the image below. In this case you will need to configure etherchannel bonding on the switch.
Next
is bridging. Bridging allows the aggregation of two or more router ports into one broadcast domain. Router ports are in separate broadcast domains by default, meaning that
no two router ports can be assign IPs from the same subnet. As good as this
intention is, it often poses a challenge when you want to extend an office
network to other locations while still maintaining the same subnet.
To
solve this challenge, you can bridge the port connecting to your office network
and the port connecting to the other locations and assign an IP to the bridge
port. This will make it possible for users in other locations to use IPs from
the same subnet as those in the office. To bridge two Mikrotik router ports,
follow the steps below.
[admin@MikroTik]
/interface bridge> add
/interface bridge> add
[admin@MikroTik]
/interface bridge port> add bridge=bridge1 interface=ether2
/interface bridge port> add bridge=bridge1 interface=ether2
[admin@MikroTik]
/interface bridge port> add bridge=bridge1 interface=ether3
/interface bridge port> add bridge=bridge1 interface=ether3
You
can assign an IP to the bridge1 port as shown below, though the IP can also be
assigned to any of the ports in the bridge and it will still work perfectly:
can assign an IP to the bridge1 port as shown below, though the IP can also be
assigned to any of the ports in the bridge and it will still work perfectly:
[admin@Router1]
ip address> add address=192.168.1.1/24
interface=bridge1
ip address> add address=192.168.1.1/24
interface=bridge1
Now
that we have seen how we can configure interface bonding and bridging, what is
the difference between them?
that we have seen how we can configure interface bonding and bridging, what is
the difference between them?
The difference between bonding and bridging
While parts of the difference have been explained
above, the major difference is that while the bonded interfaces connect to the
same device and provide automatic failover in the event that one of the links
fail, the bridged ports do not connect to the same device and do not provide
any form of reliability through automatic failover.
above, the major difference is that while the bonded interfaces connect to the
same device and provide automatic failover in the event that one of the links
fail, the bridged ports do not connect to the same device and do not provide
any form of reliability through automatic failover.
Having any issues with the concepts explained in this piece? Leave me a comment. Thanks for reading and, please stay safe.