
I am going to show you how easy it is to set up an IP tunnel between two locations. This will allow you to access files on a server and share printers between two locations, no matter how far apart. In addition, it enhances data security by encrypting packets as they travel through the tunnel. To accomplish this task, you will need two Mikrotik routers, one at each location, and two public IP addresses. So, I have got two Mikrotik routers, RB750 and two public addresses, now lets jump into the configurations.
To further guide us in this task, lets look at the network diagram below:
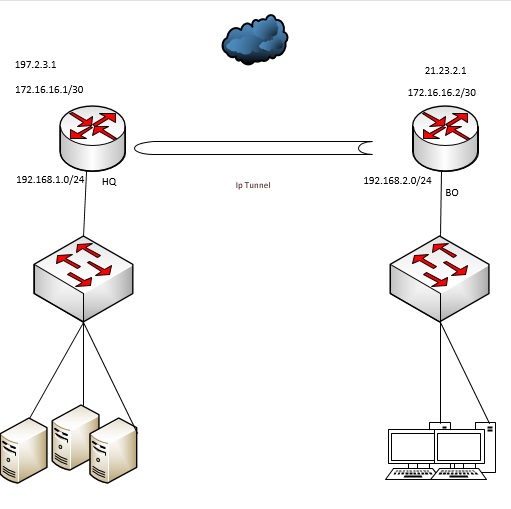
From our network diagram, we have two routers, HQ and BO. The HQ router is assigned the public IP 197.2.3.1 while the BO router on the other side is given 21.23.2.1. The subnet 172.16.16.0/30 has been assigned to the tunnel from where 172.16.16.1 is for the tunnel interface on the HQ router while 172.16.16.2 is for the tunnel interface on router BO.
Our objective is to set up an IP tunnel for users attached to the both LANs to reach one another.
Starting off on router HQ, we assign IPs to the WAN and LAN ports, configure NAT and default route, and confirm that we have access to the internet.


Now, repeat these steps for router BO and confirm that it can access the internet. If it has access to the internet, then you are good for the next phase which is setting up the IP tunnel. First, go to IP>interface. Click on the plus sign and choose IP tunnel. When the window opens, enter your details just like I did below:

You may like: How to configure site-to-site Ipsec VPN tunnel to connect branch office to the HQ
Go to IP>address and assign the tunnel address to the Tunnel interface created above. Mine was assigned 172.16.16.1 as shown below:

Next, we create a static router to forward traffics destined to the branch office LAN to the IP address of the tunnel interface on BO router. Since we configured 172.16.16.1 on the Head office tunnel interface, 172.16.16.2 is given to the tunnel interface on the Branch office router. Find below:

And lastly, we create a NAT rule to accept traffics from HQ LAN to BO LAN as show below:
