
If you are a network administrator/engineer, then the Mikrotik Queue Tree has got to be your coolest way of sharing your limited bandwidth among your users in such a way that the bandwidth allocated to a group or a user, becomes available for others if the user to whom the bandwidth was allocated is not available at that time. What inexperienced net admins do, is to use simple queue to allocate bandwidth for individuals, groups or subnets. While this method seems to work, it is inefficient because, if you have a 2Mbps link out of which you have allocated 1Mbps to group A and 1Mbps to group B, group A will be confined to a maximum bandwidth speed of 1Mbps even if no user from group B is on the network. That is a waste of bandwidth that could have been automatically allocated to group A since no one is using it at that time.
In this demonstration, I will assume I have a 5Mbps link that needs to be shared among three groups: the Directors(2Mbps), Managers(2Mbps), and Others(1Mbps). The queue will be configured in a way that in the absence bandwidth utilization from the Directors, their allocated bandwidth will go to the managers, making sure they have 4Mbps, and if for any reason the Directors and the managers are not on the network, the “Others” group gets to use the entire 5Mbps. However, each group will be confined to their allocated bandwidth, as long as there is at least one user from each group on the network.
To achieve this, I am going to use queue tree on my Mikrotik RB750. I will create an address list for each group, and any user whose IP address is entered in any group, becomes a member of that group and automatically inherits the policies applied to the group. To create address lists, do the follow: Click on IP>>Firewall>>Address list>>Add>>name of address-list>>users IP address.
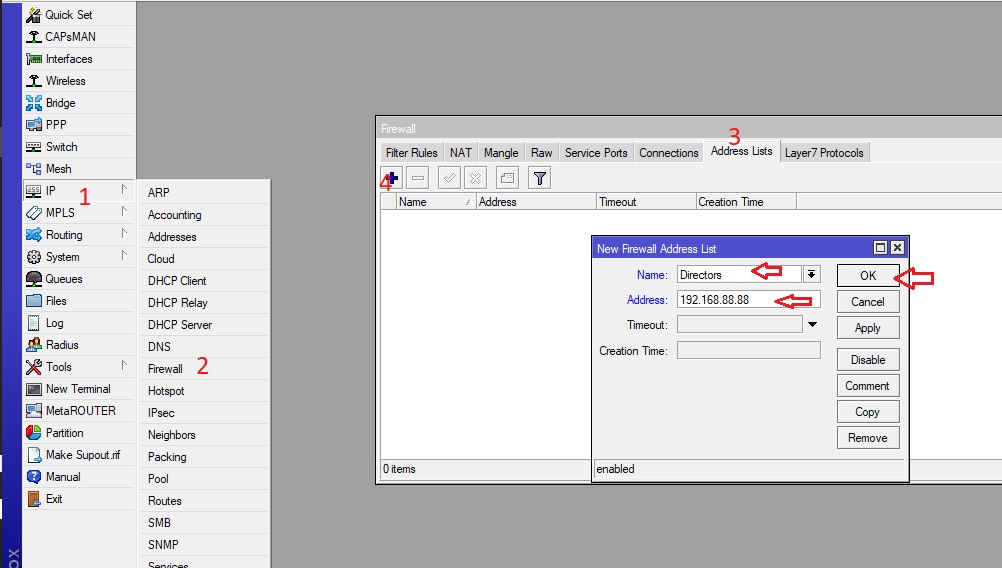
Once a name has been entered for an address list, that name is stored on the router. To add more IP addresses to that address list, simple click on the arrow beside name and choose the address list, then add the IP address of the user you want to add to that address list. Repeat the steps highlighted in the image above to create more address lists (Managers and Others)

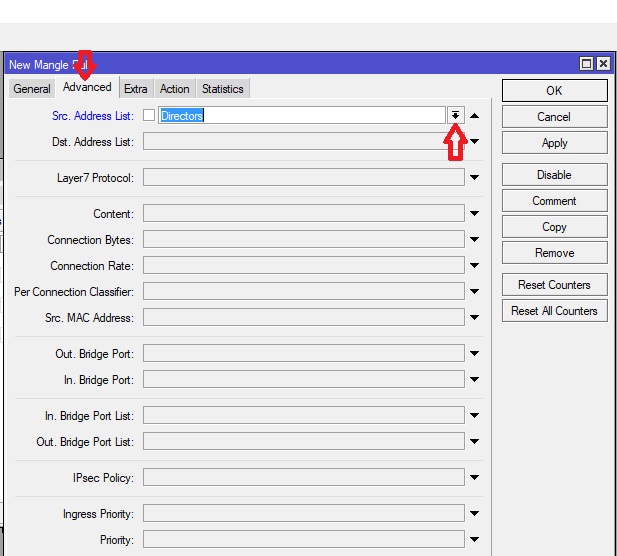
Having created the address lists, next thing is for us to match users’ packets using mangle rules. To do this, Click on IP>>Firewall>>Mangle>> Click on the add sign. The chain should be left at pre-routing, click on the advance tab, click on the arrow beside “source address list” and choose one of your earlier created address list; Directors, click on action and choose mark connection, then enter a name for the connection; a name like “Directors-Conn”. Click on apply and Ok. To get the packet for the group named Directors, again, go to IP>>Firewall>>Mangle>>add, click on connection mark and choose the one you just created; “Directors-Conn”, click on the action tab, click on mark packets and enter a name for the packets; “Directors-Packs” Repeat these steps two more times for the two remaining groups- Managers and Others. See steps in the images below:


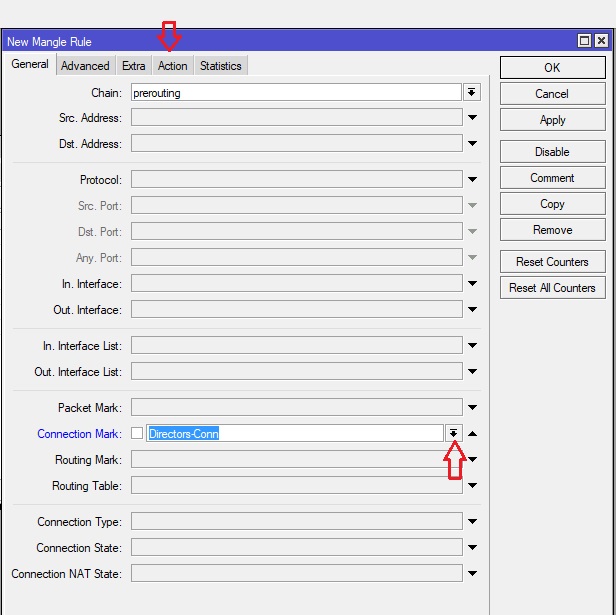
The images above are for the connection marks, to mark the packets, click on IP>>Firewall>>Mangle>> click on add,
leave the chain as pre-routing, click on the arrow beside connection mark and choose the connection whose packets you want to mark, click on the action tab, click on the arrow beside action and choose mark packet, enter a name for the packet, and click on “apply” and “Ok”. See the steps in the images below.
leave the chain as pre-routing, click on the arrow beside connection mark and choose the connection whose packets you want to mark, click on the action tab, click on the arrow beside action and choose mark packet, enter a name for the packet, and click on “apply” and “Ok”. See the steps in the images below.

Repeat the above for the other groups. Now, that we have our packets marked, let’s head to Queue Tree and configure our dynamic queue. To do that, simply click on Queue>>Queue Tree>>Add. First you create a queue for your subscribed bandwidth. That is like the total available bandwidth. Mine is 5Mbps.

Next, we create for different groups, starting with the “Directors” group. In Queue Tree, click on add, enter a name for the queue, parent should be total (the total available bandwidth queue created above), choose the packet mark for the group, enter the a value for the group’s limit when other group users are on the network (limit at) and a value for the maximum bandwidth the group can enjoy when the other groups are not on the network (Max limit)

Repeat the steps above for Mangers, and Others. If you do everything right, you will have an output similar to the image below.
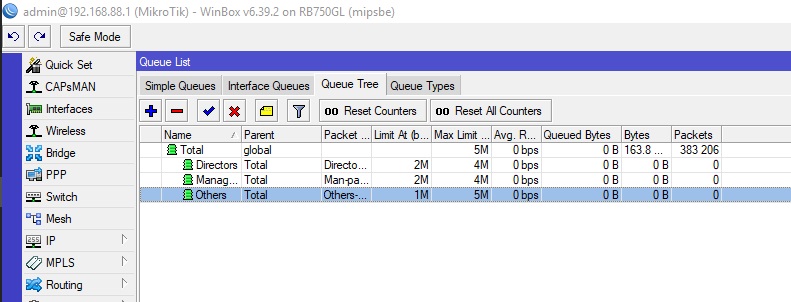
For this to work very well, make sure the priority for “Directors is lower the that of ” Managers” which is in turn lower than that of “Others” For example, Directors priority should be 5, mangers 6, while Others should be left at the default which is 8. The lower the priority number, the higher. This will make sure that the Directors will take up the bandwidth allocated to Others ahead of “Managers” if no user from the “Others” group is on the network.
You may also like: How to control downloads using MIkrotik PCQ
Most people usually configure queues for download and upload packets. I have found such method to be a waste of time as it doesn’t work. The method used in this demonstration works for both download and upload packed.Feel free to drop your questions in the comment box. Thanks for reading and stay safe.
Am trying to implement bandwidth control with freeradius,Simple queues are dynamically created with specific rate limits e.g 64k/64k but users still get maximum bandwidth
Your requirement can be achieved using pcq. See http://timigate.com/2018/07/how-to-control-downloads-using-mikrotik-pcq.html
Also check your firewall: fasttrack