

One of the best pieces of equipment out there
that you can use for long-distance point to point links is the Ubiquiti
Airfibre 5X. This device is engineered to give you adequate throughput even when
your link covers a distance of about 200km. If you have your radios properly
configured and aligned, you are guaranteed of nothing less than 100Mbps on a
link of about 50km. That said, while deploying the Ubiquiti Airfibre 5X, you must
not forget that it uses the unlicensed 5GHz frequencies and as such, is
susceptible to interference. With this in mind, it is highly unlikely that you
get up to the 500Mbps over 200km as stated by Ubiquiti, but with good setup and
optimization, you can get enough throughput to take care of your bandwidth needs. Let’s see how it is done below:
Master
The
Ubiquiti Airfibre 5X is setup in a master-slave settings, similar to the
AP-Station that we are all used to. The transmitting device is configured as the Master while the receiving is the Slave. To connect to the master radio, do
the followings on your computer:
Ubiquiti Airfibre 5X is setup in a master-slave settings, similar to the
AP-Station that we are all used to. The transmitting device is configured as the Master while the receiving is the Slave. To connect to the master radio, do
the followings on your computer:
>>
Assign the IP 192.168.1.1
Assign the IP 192.168.1.1
>>
Subnetmask 255.255.255.0
Subnetmask 255.255.255.0
>>
Connect a cable from the data port of the radio adapter to the LAN port of your
computer
Connect a cable from the data port of the radio adapter to the LAN port of your
computer
>>
Confirm connection to the radio by pinging it from the command prompt.
Confirm connection to the radio by pinging it from the command prompt.
>>
Open a web browser and enter the IP 192.168.1.20
Open a web browser and enter the IP 192.168.1.20
>>
The default username is ubnt while password is ubnt
The default username is ubnt while password is ubnt
Upon a
successful login, do the following:
successful login, do the following:
>>
Set wireless mode to Master
Set wireless mode to Master
>>
Set link name
Set link name
>>
Click on change and select country of residence
Click on change and select country of residence
>>
Channel width can be set to 40MHz
Channel width can be set to 40MHz
>>
Set Max modulation mode to 10x
Set Max modulation mode to 10x
>>
On frequency setting, choose frequencies from the list of allowed frequencies
for your chosen country.
On frequency setting, choose frequencies from the list of allowed frequencies
for your chosen country.
>>
Set wireless security to ASCII and enter password.
Set wireless security to ASCII and enter password.
>>
Change the IP on the radio to something else
Change the IP on the radio to something else


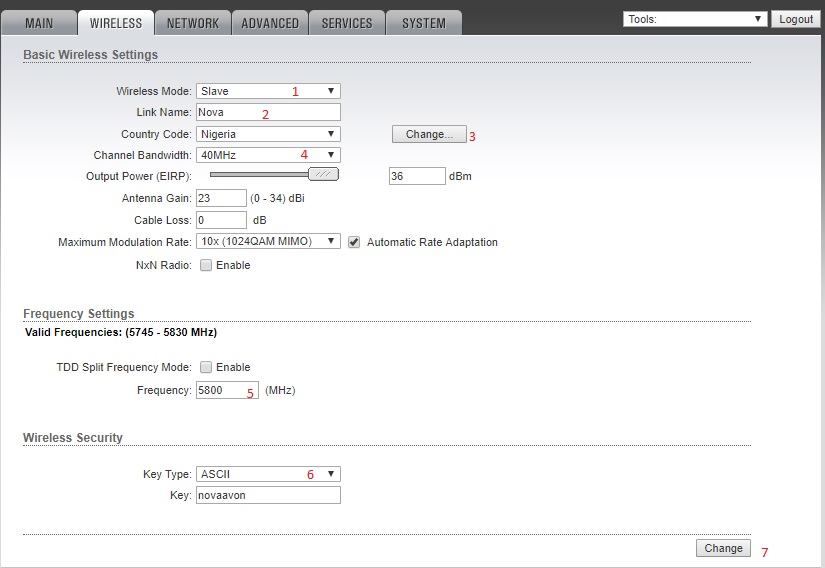
On the slave radio, do the following:
>>
Set the wireless mode to Slave
Set the wireless mode to Slave
>>
Set link name to same as Master
Set link name to same as Master
>>
Change country to same as master
Change country to same as master
>>
Set channel width to same as master
Set channel width to same as master
>>
Set frequency to same as master
Set frequency to same as master
>>
Set max modulation mode to same as master
Set max modulation mode to same as master
>>
Set Wireless Security to same as master
Set Wireless Security to same as master
>>
Change IP. IP must be on the same subnet with the one set on the master.
Change IP. IP must be on the same subnet with the one set on the master.

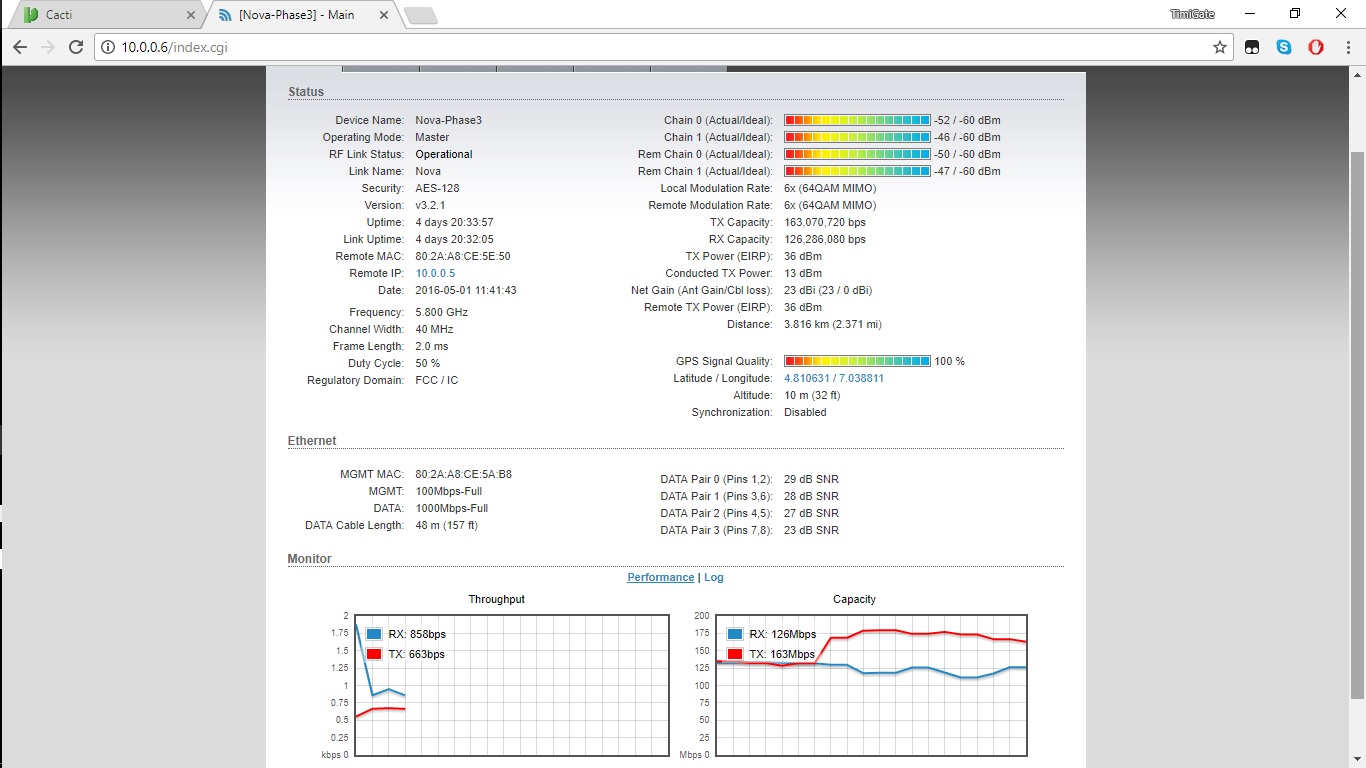
Position and align radios correctly to connect. Once
connected, you will get connection status as shown in the image below.
connected, you will get connection status as shown in the image below.
You may also like:
How to configure Mikrotik point to multipoint
How to set security profile on Mikrotik
NCC approved unlicensed frequencies in Nigeria