
Fortigate IPsec Site to site VPN implementation is required for connecting a branch office running on a Fortigate firewall to its headquaters, also on a Fortigate firewall. Its authentication medium can either be certificate based or pre-shared key. My solution will be implemented on the GNS3 platform and would be kept brief and simple.
This lab will simulate a branch-office-to-HQ architecture and provide secure connectivity solution between the HQ and the branch office networks. The two Fortigate firewalls at both HQ and BO will connect to each other on port1 while their respective LAN networks would be configured on port2 on each device. No routing protocol (dynamic or static) would be enabled on either of the firewall devices to ensure that LAN-to-LAN communication remains impossible except via the Fortigate IPSEC site to site VPN that would be configured in this lab.
Addressing scheme
The WAN link between both firewalls is 1.1.1.0/30. Firewall_1’s port1 is assigned 1.1.1.1/30 with a LAN IP address of 192.168.10.1/24 assigned to its port2 while firewall_2’s port1 is assigned 1.1.1.2/30 with the LAN IP address of 192.168.20.1/24 assigned to its port2. See commands for ip address configuration below.
config system interface
edit port1
set alias WAN
set mode static
set ip 1.1.1.1/30
set allowaccess ping https
next
edit port2
set alias LAN
set mode static
set ip 192.168.10.1/24
set allowaccess ping https
end
Repeat the steps above on the branch office firewall, using the correct IPs (1.1.1.2/24 and 192.168.20.1/24).
Fortigate IPSEC site to site VPN configuration
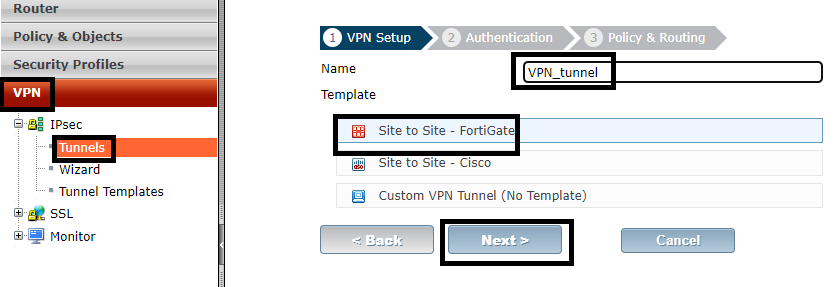
This part of the lab will be done on the GUI interface. See how to access Fortigate GUI on GNS3. Here, I will simply configure an IPSEC tunnel using preshared key for authentication and allow traffics sourced from 192.168.10.0/24 network to 192.168.20.0/24 network and vice versa through. The steps for setting up Fortigate ipsec site to site VPN are captured in the below images.
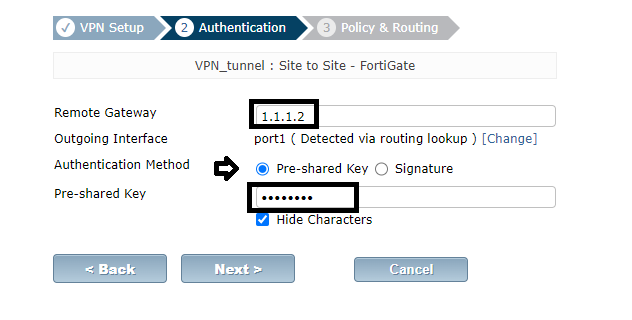
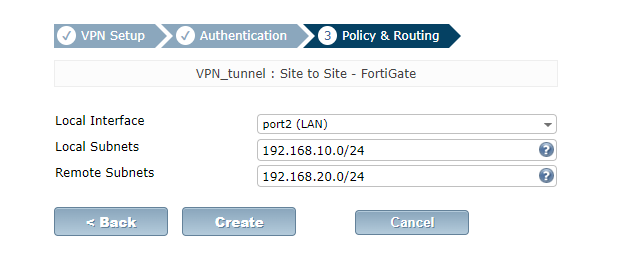
Repeat the steps on the second Fortigate, ensuring that the correct remote gateway and subnet addresses are entered.
If you enjoyed this tutorial, please subscribe to this blog to receive my posts via email. Also subscribe to my YouTube channel, like my Facebook page and follow me on Twitter.