
Cisco IPSEC VPN is a must for anyone who desires to manage an enterprise network. I have always faulted the old CCNA curriculum that excluded VPN setup. It meant that many CCNA holders did not have the knowledge of how to configure IPSEC VPN except they went further by studying for the CCNA security. As expected, Cisco has recently realized this and has therefore included IPSEC VPN in the CCNA curriculum, making it a must for aspiring CCNAs. The IPSEC VPN is a technology that allows you to successfully encrypt packets sent from one LAN to the other over the public internet. In this post, I will share with us on how to successfully configure an IPSEC VPN using GNS3.
LAB requirement:
The Cisco 3600 series router running on GNS3.
Network Topology.

Objective to set up IPSEC VPN on R1 and R3 to allow communication between networks 192.168.10.0/24 and 192.168.20.0/24. The WAN links between R2 , R1 and R3 are configured for /30. I will start my configuration from R2. In reality, our job will be done on both R1 and R3.
Interface configuration on R2
R2(config)#int f0/0
R2(config-if)#ip add 192.168.1.2 255.255.255.252
R2(config-if)#description connection to R1
R2(config-if)#no shut
R2(config-if)#int f0/1
R2(config-if)#ip add 192.168.2.2 255.255.255.252
R2(config-if)#description connection to R3
R2(config-if)#no shut
Interface configuration on R1
R1 configuration
R1(config)#int f0/0
R1(config-if)#ip add 192.168.1.1 255.255.255.252
R1(config-if)#desc connection to R2
R1(config-if)#no shut
R1(config-if)#int f0/1
R1(config-if)#ip add 192.168.10.1 255.255.255.0
R1(config-if)#desc connection to LAN
R1(config-if)#no shut
R1(config-if)#exit
R1(config)#ip route 0.0.0.0 0.0.0.0 192.168.1.2
IPSEC VPN configuration on R1
First, we need to configure an access-list to match LAN to LAN traffics
R1(config)#ip access-list extended VPN
R1(config-ext-nacl)#permit ip 192.168.10.0 0.0.0.255 192.168.20.0 0.0.0.255
R1(config-ext-nacl)#exit
R1(config)#
Then the VPN setup
R1(config)#crypto isakmp policy 1
R1(config-isakmp)#authentication pre-share
R1(config-isakmp)#crypto isakmp key TimiGate address 192.168.2.1 (IP address of remote router)
R1(config-isakmp)#exit
R1(config)#crypto ipsec transform-set TGSET esp-aes esp-sha-hmac
R1(config)#crypto map TGMAP 1 ipsec-isakmp
R1(config-crypto-map)#set peer 192.168.2.1
R1(config-crypto-map)#set transform-set TGSET
R1(config-crypto-map)#match address VPN
Finally, on R1, we apply the crypto map to the interface connecting to the ISP
R1(config)#int f0/0
R1(config-if)#crypto map TGMAP
On R3
R3 configuration
R3(config)#int f0/0
R3(config-if)#ip add 192.168.2.1 255.255.255.252
R3(config-if)#desc connection to R2
R3(config-if)#no shut
R3(config-if)#int f0/1
R3(config-if)#ip add 192.168.20.1 255.255.255.0
R3(config-if)#desc connection to LAN
R3(config-if)#no shut
R3(config-if)#exit
R3(config)#ip route 0.0.0.0 0.0.0.0 192.168.2.2
IPSEC VPN configuration on R3
First, we need to configure an access-list to match LAN to
LAN traffics
LAN traffics
R3(config)#ip access-list extended VPN
R3(config-ext-nacl)#permit ip 192.168.20.0 0.0.0.255 192.168.10.0 0.0.0.255
R3(config-ext-nacl)#exit
R3(config)#
Then the VPN setup
R3(config)#crypto isakmp policy 1
R3(config-isakmp)#authentication pre-share
R3(config-isakmp)#crypto isakmp key TimiGate address 192.168.1.1 (IP address of remote router)
R3(config-isakmp)#exit
R3(config)#crypto ipsec transform-set TGSET esp-aes esp-sha-hmac
R3(config)#crypto map TGMAP 1 ipsec-isakmp
R3(config-crypto-map)#set peer 192.168.1.1
R3(config-crypto-map)#set transform-set TGSET
R3(config-crypto-map)#match address VPN
Finally, on R3, we apply the crypto map to the interface
connecting to the ISP
connecting to the ISP
R3(config)#int f0/0
R3(config-if)#crypto map TGMAP
Finally, configure the interfaces on R4 and R5 with IP addresses from their various subnets and try to ping from R4 to R5 or vise versa. If done properly, the pings should be successful even though there are no routes from R2(ISP router) to the LANs. Packets to the LANs will be encrypted and sent via the IPSEC VPN tunnel.
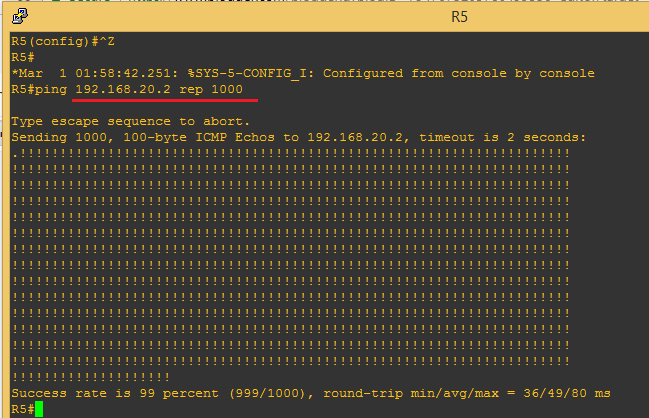
We can use the sh crypto ipsec sa command to verify VPN connection.

If you need help building this LAB on GNS3, drop me a comment.
Hi Sir. Thank you for this very simple demonstration.I just have a little concern on R2(ISP side). How can R1 send packet to R3 without using any routing protocol on R2? Thank you.
Aaron, that's the essence of the vpn. I created an access list called vpn. What it does is to allow traffic from the lan on R1 ,going to the lan on R3 to be sent to R3 via the vpn tunnel. If I set up routing on R2,then no need for the vpn cos traffics will be sent through the ISP network (internet) instead of the vpn tunnel.
Helpfull post for me,,,,
I’m glad you found it helpful. Thanks
What is the necessary creating acces-list for r1 router and r2 router.Is it working Vpn tunnel Without access-list ,,,
The access-list is used to permit lan to lan traffics through the established vpn circuit.
Hi , I configured a same lab with diffrent dimensions. But crypto isakmp table showing nothing, can you please help?
Check your preshared key and also ensure that the specified IP is that if the remote router.