
simulate a site-to-site IPsec VPN in five minutes!
Network topology
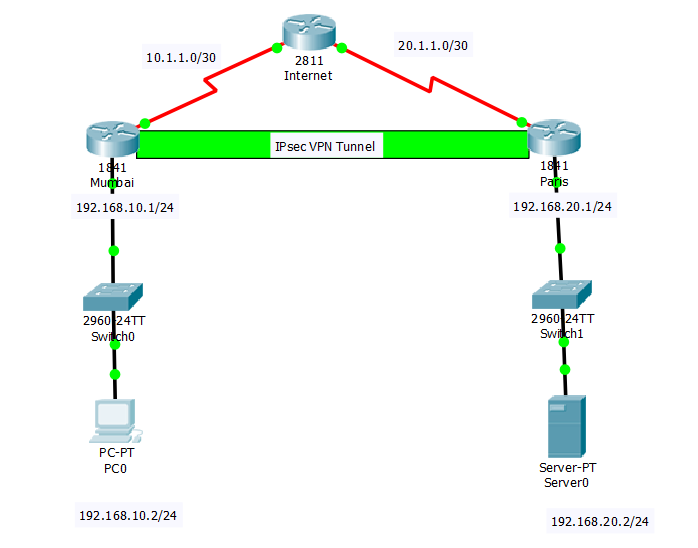
The Cisco 2811 router was used as the Internet router, while the 1841 security router was deployed in Mumbai and Paris offices. We have a https server in Paris that needs to be securely accessed from Mumbai. To make sure that https request from Mumbai to the server in Paris remain secure, we need to set up site-to-site IPsec VPN between Mumbai and Paris.
You may also like: Connecting branch offices to the HQ using GRE tunnels
On Internet router
Router>en
Router#conf t
Router(config)#hostname Internet
Internet(config)#int s0/3/0
Internet(config-if)#clock rate 64000
Internet(config-if)#ip add 10.1.1.1 255.255.255.252
Internet(config-if)#desc connection to Mumbai
Internet(config-if)#no shut
Internet(config-if)#int s0/1/0
Internet(config-if)#clock rate 64000
Internet(config-if)#ip add 20.1.1.1 255.255.255.252
Internet(config-if)#desc connection to Paris
Internet(config-if)#no shut
Internet(config-if)#
Internet(config-if)#exit
Internet(config)#exit
Internet#
Internet#copy run start
On Mumbai router
Router>en
Router#conf t
Router(config)#hostname Mumbai
Mumbai(config)#int s0
Mumbai(config-if)#ip add 10.1.1.2 255.255.255.252
Mumbai(config-if)#desc connection to Internet
Mumbai(config-if)#no shut
Mumbai(config-if)#int f0
Mumbai(config-if)#ip add 192.168.10.1 255.255.255.0
Mumbai(config-if)#desc connection to LAN
Mumbai(config-if)#no shut
Mumbai(config-if)#exit
Mumbai(config)#ip route 0.0.0.0 0.0.0.0 10.1.1.1 name to_isp
Mumbai(config)#
On Paris Router
Router>en
Router#conf t
Router(config)#hostname Paris
Paris(config)#int s0
Paris(config-if)#ip add 20.1.1.2 255.255.255.252
Paris(config-if)#desc connection to Internet
Paris(config-if)#no shut
Paris(config-if)#int f0
Paris(config-if)#ip add 192.168.20.1 255.255.255.0
Paris(config-if)#desc connection to LAN
Paris(config-if)#no shut
Paris(config-if)#exit
Paris(config)#ip route 0.0.0.0 0.0.0.0 20.1.1.1 name to_isp
Paris(config)#
Next, is VPN configuration on the Mumbai router. First of all, set up an access-list to match the traffics to be allowed through the VPN tunnel.
Mumbai(config)#ip access-list extended VPN
Mumbai(config-ext-nacl)#permit ip 192.168.10.0 0.0.0.255 192.168.20.0 0.0.0.255
Mumbai(config-ext-nacl)#exit
Mumbai(config)#
Now, configure IPsec VPN to use the access-list named VPN. Authentication mode is pre-share key (TimiGate). The key must be the same on both routers. See below.
Mumbai(config)#crypto isakmp policy 1
Mumbai(config-isakmp)#authentication pre-share
Mumbai(config-isakmp)#crypto isakmp key TimiGate address 20.1.1.2 (The public IP address of Paris router)
Mumbai(config-isakmp)#exit
Mumbai(config)#crypto ipsec transform-set TGSET esp-aes esp-sha-hmac
Mumbai(config)#crypto map TGMAP 1 ipsec-isakmp
Mumbai(config-crypto-map)#set peer 20.1.1.2
Mumbai(config-crypto-map)#set transform-set TGSET
Mumbai(config-crypto-map)#match address VPN
Finally, on the Mumbai router, we MUST apply the crypto map to the interface connecting to the ISP.
Mumbai(config)#int s0/1/0
Mumbai(config-if)#crypto map TGMAP
Now, repeat the process on the Paris router, making sure the IP address of the peer router matches the public IP address configured on the Paris router. Remember, this IP must be reachable from the Mumbai router. First, the ACL.
Paris(config)#ip access-list extended VPN
Paris(config-ext-nacl)#permit ip 192.168.20.0 0.0.0.255 192.168.10.0 0.0.0.255
Paris(config-ext-nacl)#exit
Paris(config)#
Next, the VPN configuration proper.
Paris(config)#crypto isakmp policy 1
Paris(config-isakmp)#authentication pre-share
Paris(config-isakmp)#crypto isakmp key TimiGate address 10.1.1.2 (The public IP address of Paris router)
Paris(config-isakmp)#exit
Paris(config)#crypto ipsec transform-set TGSET esp-aes esp-sha-hmac
Paris(config)#crypto map TGMAP 1 ipsec-isakmp
Paris(config-crypto-map)#set peer 10.1.1.2
Paris(config-crypto-map)#set transform-set TGSET
Paris(config-crypto-map)#match address VPN
Finally, apply the crypto-map to the WAN interface.
Paris(config)#int s0/1/0
Paris(config-if)#crypto map TGMAP
What to note:
The IPsec VPN configuration will be in four phases.
1.Configuration of the access-list to match allowed traffics.
2.Configuration of the authentication phase which in this case makes use of pre-share key named TimiGate.
3.Configuration of the encryption phase which in this case uses esp-aes esp-sha-hmac
4.The placement of the crypto-map on the connecting interface. This must be the interface with the public IP used in the VPN configuration.
Verification:
To see the status of IPSEC authentication, use the command #sh crypto ipsec sa command. See output below

The show crypto isakmp sa command will show encryption status.

Finally, I will try to access the server in Paris from the PC in Mumbai.


To get the packet Tracer file for this LAB, drop your email address in the comment box.
Above File Required
It has been sent. Check your mail.
Cisco Packet Tracer File Requesting
Thanks for the tip. I really appreciate it. Please I need the file through my mail. Thanks a lot
Check your mail, it has been sent. Thanks
pacet traser
onedecible@gmail.com
packet tracer file
I will really need it. This is my
kabeerlurwan@gmail.com
Hello Kabeer, the requested file has been sent to your email.
Regards.
Nice one bro. Kindly send me file j_ojo1@yahoo.com. I have also sent you a friend request via linkedin if you don’t mind.
File has been emailed to you. Thanks
He thanks for the explanation can u share it through my email mujibhabibi36@gmail.com
The packet tracer file has sent to your email address. Thanks
Hello Michael,
Could you please help s3nding LAB based for Cisco Site-to-Site IPSec VPN.
Thank you in advance.
Best regards,
Tamang
Sent. Kindly follow this blog to have my posts sent directly to you via emails.
hello,
packet tracker file is not comptiable with packet tracker version 7.1.
could you please send the file comptiable to 7.1?
@ajir44@gmail.com
thank you.
BR,
Tamang
The lab was built with packet tracer 6. I will have to rebuild it in 7.1 and mail to you. Thanks.
Please send me Lab for How to connect branch offices to the HQ using Cisco Site-to-Site IPSec VPN.
At zafsyed@gmail.com
Thanks in advanced.
Sent, regards.
Please share with me
The requested file has been mailed to you. Kindly stay up to date by subscribing to this blog, like on Facebook, follow on Twitter and subscribe to the YouTube Channel.
Nice lab
Hi
Please share site to site VPN Lab on below email address
irshad7733@gmail.com
Hi
Please share above file on
irshad7733@gmail.com
Plz share this on my email bellow
Killervd007@gmail.com
The requested file has been mailed to to you. Regards.
Please share the file and thanks for sharing this simulation. My email is :
juanram@hotmail.es
The requested file has been sent to your mailbox. Thanks.
Pls send me the file too . . . dkp@hotmail.com
Thanks a lot !!
Hello,
File has been sent to your email.
Thanks
Thanks
Hello,
The requested file has been sent to your mail.
Thanks
Gracias
santicent9@gmail.com
santicent9@gmail.com
Please send me the file, thanks a lot!!
royclosa@hotmail.com
I need packet tracer file
sir please send it too kjj.sace@gmail.com thanks
Babseun28@gmail.com. pls cud u add your number to mail. Lets talk. Thanks
Wasn’t ipsec vpn taken off out of the exam… it’s not in course materials anyway plus you can implement ipsec for a long time
IPSec vpn is core for CCNA security. However, you don’t know networking, if you don’t know how to set up site to site IPSec vpn. This is just my humble opinion.
this is my email: melmerveille8@gmail.com
please i need the lab file. thanks
Hello dear, hope you are fine. please i need your help
i want to use your lab for a presentation in my school but i am a bit confused because they are many terms that i don’t understand like that functionality of the crypto map, of the authentication mode and all the key used.
so if you could please write me a file where you explain every the line of your configuration, it will be very greatfull. please try and do something like that and send it to me. i really need it. please
this is my email: melmerveille8@gmail.com
Please send me the lab file to: onoxphoto@gmail.com
Tnx (: