
To have an established end-to-end connection using Mikrotik wireless radios, two sets of equipment will be required: the access point (AP) and the station. Both radios may not be different in terms of specifications and physical appearance. The difference will be in the configuration setups on both radios. First the AP will be configured and installed, pointing to the direction of the station, after which, the station will be configured and installed, making sure it is pointed in the direction of the AP. The user is required to scan for the SSID configured on the AP radio, identify and connect to it.
Establishing wireless connectivity using Mikrotik is quite simple when you know what you are doing. But if you do not, don’t worry, you will learn in this post that setting up a Mikrotik wireless link is as easy as remembering your name.
Access point
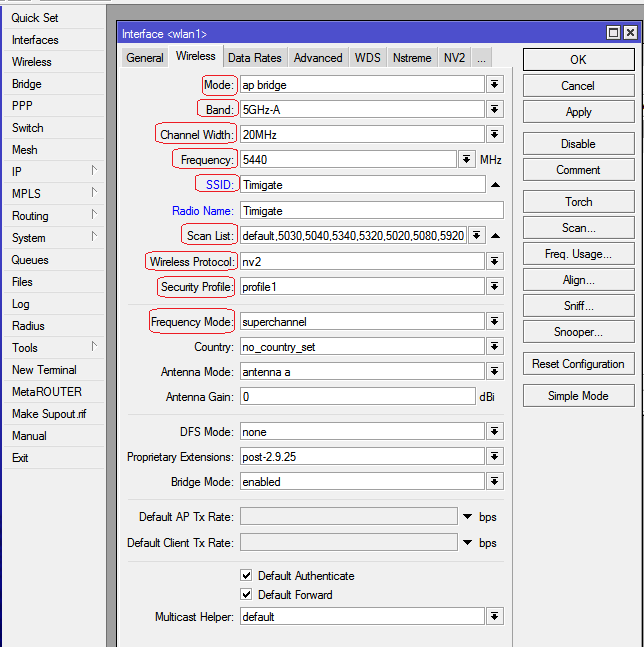
In the image above, the mode is set to AP, meaning this radio will be used for point-to-multipoint connection. The band is 5GHz while the channel width is set to 20MHz. The frequency is important and must be noted and entered on the frequency scanlist on the station radio. This is only necessary because this radio has been configured to use frequencies from the superchannel list, else, using a frequency from the default frequency list means you do not have to list such frequency on the scanlist of the station radio. The security profile on the AP must be exported, copied and imported into the station radio. See
here for how to export and import security profile. On the station radio connecting to an AP, the steps are quite easy. See
image below:
here for how to export and import security profile. On the station radio connecting to an AP, the steps are quite easy. See
image below:
Station
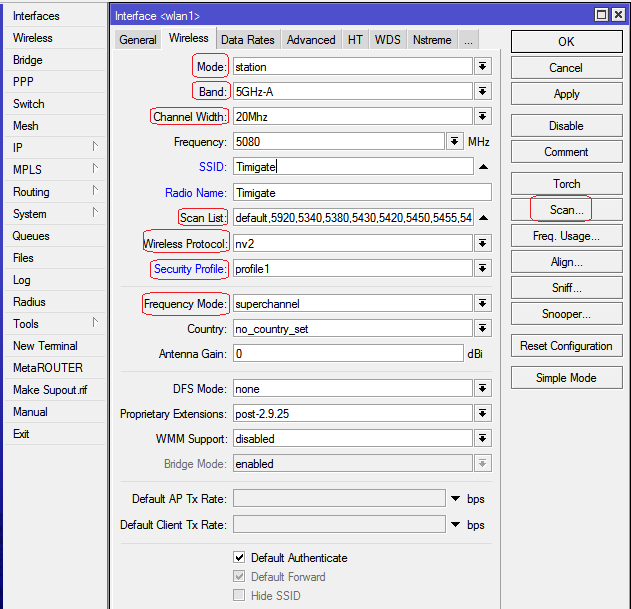
From the image above, the user must set the wireless mode to station (which is the choice by default) band is 5GHz-A (same as the AP), no need to enter the frequency and the SSID since user needs to scan to pick up signals, provided the frequency on the AP has been entered on the frequency scanlist of the station. Frequency mode must be set to same as the AP, in this case, superchannel. Wireless protocol must be same as it is on the AP or set to any. After the frequency on the AP has been entered on the scanlist and the security key imported on the station radio, the user is required to scan to pick up and connect to the
wireless signal transmitted by the AP. After connection has been established, user should click on registration on the wireless interface of either the station or AP radio to get details regarding the connection as shown below:
wireless signal transmitted by the AP. After connection has been established, user should click on registration on the wireless interface of either the station or AP radio to get details regarding the connection as shown below:
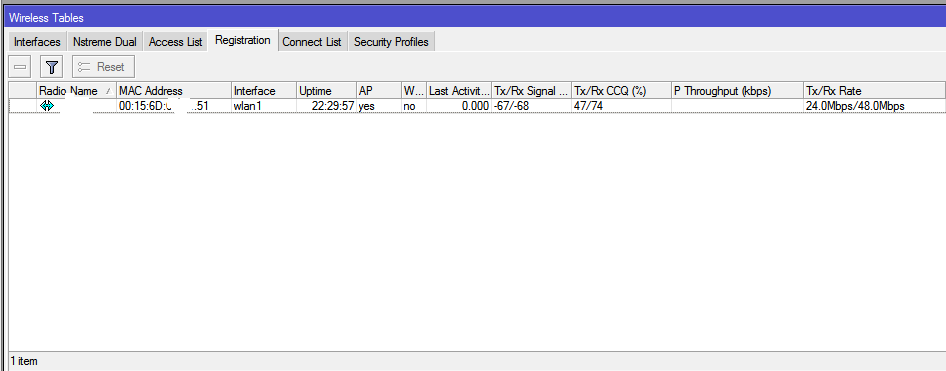
Setting the radio name on the wireless menu makes for easy identification of connected clients.
That is how easy it is to deploy wireless links using Mikrotik radios. If have questions bothering on radio and antenna types or advance configuration setups, kindly leave me a comment. Dont forget to like my Facebook page, subscribe to my YouTube channel and follow me on Twitter.
Hi! … I should build a point-to-point wireless bridge with two mikrotik disc lite 5. I have two devices with Ethernet interface (RRC-1258) to manage a single electronic device but separate (Control Unit and Remote Unit). These two devices (RRC-1258) have the default configuration for ADSL line, but with the possibility of making a different setting such as IP, DHCP, NETMASK, GATEWAY, SIP Contact, SIP PORT and etc.
What do you recommend to do in this regard and which configuration to load on the two Mikrotik routerboards?.
Thanks !
Can you provide a network topology that will aid in understanding your setup? Thanks