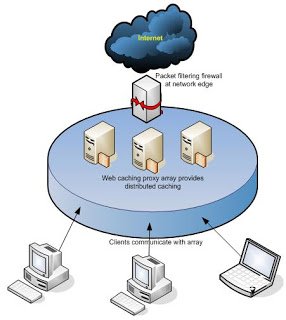
I will like to explain this topic in a straight and easy-to-understand manner. Web caching allows you to cache a percentage of your internet traffics and make it local to your users. What this means is that when you set up caching on your LAN, web pages will be stored on your local cache server so that the next time a user on your LAN requests such pages, it will be made speedily and readily available to such user by your router. In this demonstration, I will use the Mikrotik technology. To accomplish this, we will do the following:
>> Enable web-proxy on the Mikrotik serving as our cache server
>> Configure mangle rules on the main router to match LAN HTTP connections and LAN HTTP traffics
>> Configure destination NAT on the main router to redirect our internet-bound HTTP traffics to the cache server.
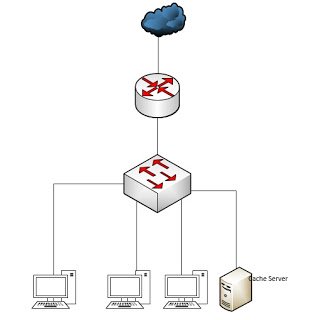
From the diagram above, we have two routers; the main router connecting us to the internet and the one serving as a cache server. Both of them are Mikrotik routers. The cache server is a computer running the Mikrotik routerOS. Alternatively, you can use a Mikrotik router with a usb port. That way, you will be able to cache on a connected external hard disk
On the cache server
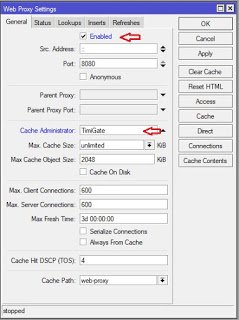
First of all, be sure the cache server can get to the internet. To enable we proxy on the Mikrotik router serving as our cache server, do the following:
>> Click on IP>>Web proxy >>General, check enable, enter your cache administrator’s name and make sure cache size is set to unlimited.
You may also like: 9 things you must do on a Mikrotik router to effectively secure your network
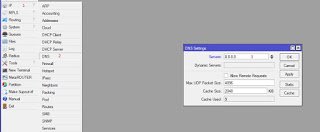
Next, we enable DNS:
>>IP>>DNS, and enter your preferred DNS address.
On the main router, we do the following:
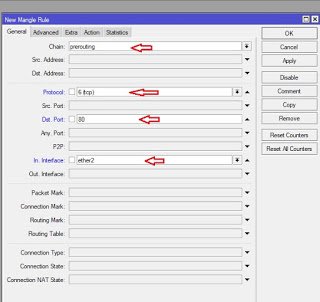
First, we mark HTTP connections using the mangle rule.
>>IP>>Firewall>>Mangle
Set chain to prerouting, set protocol to tcp, destination port to 80, and choose the interface connecting to your LAN as the in interface, click on action, choose mark connection, and type in a name for the connection mark. I used cache-con.
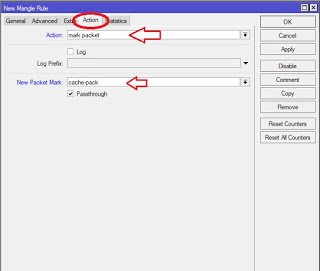
Next is to mark packets. Packet mark make use of connection mark. That is why I marked my connection first. To mark packets, we do the following:
>>IP>>Firewall>>mangle
set chain to prerouting, click on connection mark and choose the recently created connection mark, click on action and choose mark packet, then type in a name for the packets. I used cache-pack.
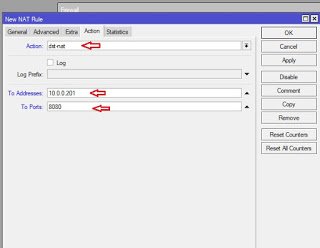
Finally, we configure destination NAT to redirect internet-bound HTTP traffics to the cache-server. In this demonstration, the cache server is plugged to my LAN switch and is assigned the IP 10.0.0.201. Do the following:
>> IP>>Firewall>>NAT>>add>>set chain to dst-nat, click on packet mark and choose the one created earlier (mine was cache-pack), click on the action tab and set action to dst-nat, in the space for “to address”, enter the IP address of the cache server (mine is 10.0.0.201), and set port to 8080. The port number should be the same with what you have on your proxy-server. If you look at the first image, you will observe that I left mine at 8080. If the port number had been set to say 80, then the port number here must be set to 80. So make sure your port number here matches with the port number you set on your proxy server.
So now that we have everything set up, how do we know that it is working. We will know that our cache server is working by going to the cache server to check.
>>IP>>Web proxy>>status
To see the video of this lab, click here
There you have it guys. If you have any question on this or any other tech issues, please drop a comment or send me a mail. You can also visit and subscribe to my YouTube channel for lab videos on tech issue.





Great post! I?m just starting out in community management/marketing media and trying to learn how to do it well ? resources like this article are incredibly helpful. As our company is based in the US, it?s all a bit new to us. The example above is something that I worry about as well, how to show your own genuine enthusiasm and share the fact that your product is useful in that case toshiba 1tb external hard disk