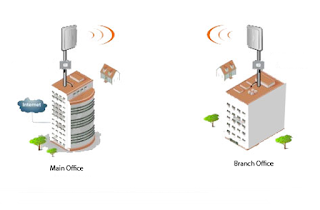
Mikrotik and Ubiquiti are unarguably two of the best things that have happened to wireless connectivity in the networking industry. In addition to providing low-cost alternatives to Ericsson, Nira, ZTE, Huawei and the rest, they afford flexibility and are not highly sensitive to power fluctuations like their expensive counterparts. I find Mikrotik router boards highly engineered and programmed to do even the most advance tasks performed on Cisco core routers. Mikrotik has been able to integrate the ability of a core router and a wireless access point all in one board leaving the user with the ability to make the most out of it; making it one of the best choices available whether for Point to point or point to multi-point set up. In this demonstration, we will at the configuration a Mikrotik Poin to Point.
Establishing a point to point link on Mikrotik is easy and straight forward and can provide you with sufficient throughput if configured properly. Mikrorik Point to point links, unlike point to multi-point links, are designed and optimized to narrow their spectrum, avoiding interference, and by do doing, provide efficient data throughput.
See most effective way to set up Mikrotik point to multi-point links
You must have carried out a site survey, noting the distance between the two locations as well as the altitude of both locations. This is important as it will help you in determining the height of your pole or mast at each of the locations, as well as in choosing the type of antenna you are to use.
After acquiring your Mikrotik radios, it could be custom-built or fully assembled radios, then you are ready for the configuration. See how to assemble a custom-built Wireless radio. Log on to your Mikrotik router through winbox and follow the steps below:
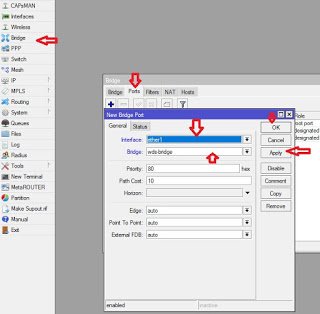
>>Create a bridge interface and assign ports to the bridge: click on bridge on the main menu on the left, click on the plus sign and give your bridge a name.
>>To assign ports to the bridge, click on bridge, click on “port”tab and add ports to your bridge. Add Ether1 and Wlan1 and click Ok. See below:
Next, we assign an IP address to the bridge port. It must not be assigned to the bridge. The IP can be assigned to any of the three interfaces. Either the Lan, Wlan1 or Bridge ports and it will work correctly but its usually best to assign it to the Wlan1 interface so that you can still access the radio remotely through the wireless interface even when the LAN has been disabled.
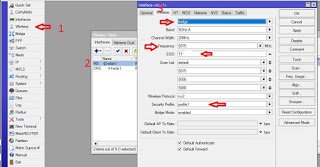
>> Next, click on the wds tab in the Wlan1 window, set wds mode to dynamic and select the bridge you created earlier as the wds default bridge as shown below:


