
In this post, I will share with us on how to successfully install a point-to-point link using channel bonding on the Cambium ptp550 radio. The Cambium PTP550 is a power outdoor radio running on the 5Ghz band designed with channel bonding feature that allows the bonding together of two radios on a physical device for increased performance.
The Cambium ptp550 image simplifies the deployment of point-to-point link by reducing the number of features that an installer is expected to activate. Once channel bonding is enabled, depending on the country of installation, operating frequencies entered for the two radios, link will be up and running in no time. Channel bonding allows the two radios, howbeit in now physical device, to be combined to give a higher throughput.
On the Master
Click on configuration, click on the radio tab and follow the steps below:
General setting
Under the general setting, radio mode must be set to master, country set your country of operation or other, and channel bonding enabled.

Master configuration
Set ssid, maximum rage the point-point link is expected to cover, and range unit. Range unit can either be in kilometer or miles.

Power control
Here you are to set your antenna gain and slave module target receive level. Both minimum and maximum values have be specified for both features. You are to choose values in between.

Scheduler
The Cambium ptp550 image software allows you to specify how download/upload bandwidth ratio is shared across the point-to-point link. Three options are available, namely: 75/25, 50/50, and 30/70. The default is 50/50.

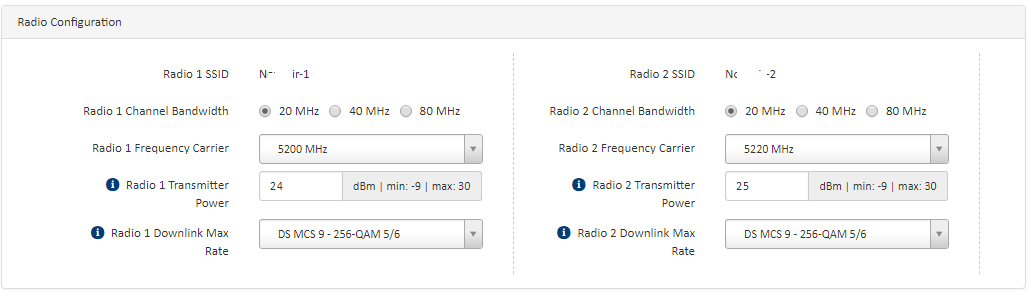
Radio configuration
Here we are to set the channel width, tx power and frequency. Note that the wider the channel, the better the performance, higher the signal and more susceptible to interference the link will be. If the distance is short, installer can use a wider channel width though it also depends on the country of operation.
 Click on the security tab, select your preferred wireless security option and enter your preshared key. You can change your radio IP by clicking on the network tab and setting a new Ip address. System name and password can be set in the system menu.
On the slave
General
Set radio mode to slave and enable channel bonding.
Power control
Specify antenna gain and network entry rssi threshold
Preferred Masters
Enter the SSID on the master, select wireless security method and preshared key.
Radio configuration
Set radio tx power for the two radios to automatic, choose radio scan channels. The channels selected must include the channel widths the master radios will be transmitting on. To be on a safe side, you installer can enable all three channels (20, 40 and 80). Finally, select radios frequencies. These must include the frequencies used on the master radios for all or any of the three bands. Installer can select all frequencies for all three bands. The advantage of doing this is that link will remain established when frequencies are changed on the master without same being done on the slave. However, scanning will take more time because of the number of frequencies on three different channels that will be scanned.
Link establishment
Having followed up to this point, link would have been established. To see connected stations, click on monitor then wireless.

If you enjoyed this tutorial, please subscribe to this blog to receive my posts via email. Also subscibe to my YouTube channel, like my Facebook page and follow me on Twitter.