
This topic has been treated by a lot of people but in most cases, you are often times not guided on what to do and how to go about it. So, today, I will walk us through the steps involved in setting up your Cisco Linksys router for port forwarding.
Why do you need port forwarding?
So you can view your DVR using the public IP on your gateway. This provides some level of security since your DVR is not given a public IP.
What protocol are you using?
Since the application you will use to view the cameras is going to be a web browser, the protocol needs to be set to TCP.
What port number?
The port number for http is port 80. There are different application port numbers. If you will be viewing your cameras through an ftp application, then the port number should be set to 21, if telnet is what you desire, then it is 23, ssh is 22, and so. For list of port numbers, just google.
What IP should I forward to?
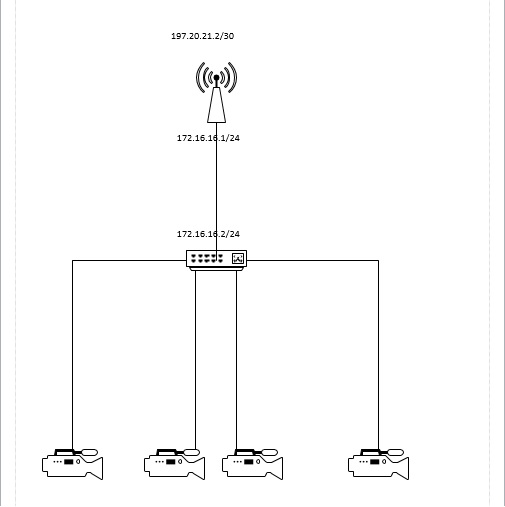
The IP to forward to is the private IP address of your DVR. Your DVR should be connected to your LAN switch and assigned a private IP address from your network. Your Linksys router should be configured with a public IP on the WAN interface. This IP must be given to you by your internet service provider. Another IP, this time a private IP, will be assigned to your LAN port. The LAN port comprises of ports 1 to 4. For example, we assign 197.20.21.2/30 to the WAN port of our Linksys assuming we got that IP from our ISP. We also assigned 172.16.16.1/24 to the LAN port of our Linksys. The DVR is given 172.16.16.2/24. We must be sure to remove the IP address given to the DVR from the DHCP pool. Failure to do this will cause the router to lease this IP to a client and that will cause an IP conflict.

From the diagram above, lets set up our router for port forwarding. See below.

First, we assigned IPs to both the WAN and LAN ports, enabled DHCP for the LAN, and assigned DNS. DNSs are usually given to you by your ISP. If your ISN has no DNS, be free to use the public DNS of 8.8.8.8 or 4.2.2.2 from Google. Next we setup port forwarding as shown below.

From outside of this network, once we open up a web browser from an internet-enabled device and type in the public IP address on the WAN port of the router, e.g 197.20.21.1, it will take us straight to the DVR on 172.16.16.2.
Thanks for reading and dont forget to like our page and drop a comment if you need answers even if it’s on a different topic.
Port forwarding on Mikrotik and Cisco routers coming soon.