This post is about how to configure Mikrotik source NAT to a specific IP address. At the basic level of your network engineering journey, you are only concerned with the masquerade feature, but as you advance, you will find out that NAT is one of the most powerful features in Mikrotik router OS.
Before going into the configuration proper, I would like to explain the difference between the use of the masquerade feature and configuring Mikrotik source NAT to a specific IP address.
You may also like: How to configure secure Mikrotik IPSec vpn using xauthentication
The former allows local hosts connected to your network to access the internet using the public IP address configured on the WAN port of your Mikrotik router while the latter allows your local hosts to access the internet using the public IP address specified by you as their source IP. The specified IP address does not need to be configured on an interface on your Mikrotik device.
From a security point of view, option two, Mikrotik source NAT, is preferable as it offers device protection, flexibility in choosing who uses what public IP on the internet and ensures that an IP address is not overloaded.
How to configure Mikrotik source NAT to a specific IP address
To configure your router to use the Mikrotik source NAT feature described in this article, simply go to the command line interafec and enter commands similar to the ones below. However, ensure that the public IP your are pointing to has been duly assigned to you by your service provider. See commands below.
/Ip firewall nat chain=srcnat action=src-nat to-addresses=8.8.8.8 src-address=10.0.0.0/16
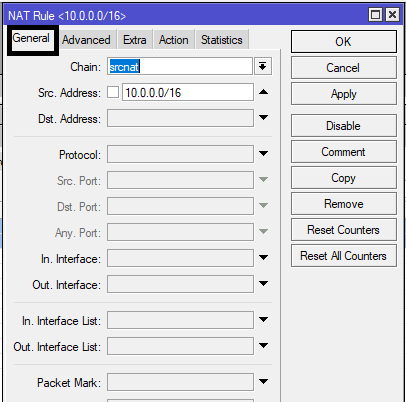
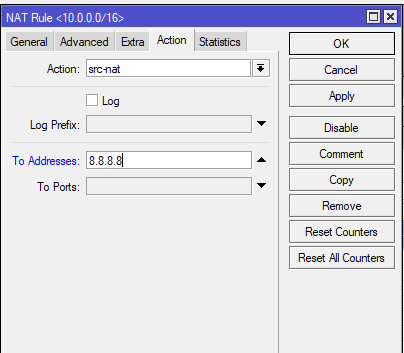
Please note that the address 8.8.8.8 used here is just for demonstration purpose. You are to enter your ISP-assigned IP address in place of 8.8.8.8. See images below if you prefer the use of winbox.


If you enjoyed this tutorial, please subscribe to this blog to receive my posts via email. Also subscibe to my YouTube channel, like my Facebook page and follow me on Twitter
