
It’s no longer news that the world is fast moving to an all-IPv6 network known as the internet 2. What is news, however, is that while most of us are reluctant to learn the skills needed to succeed on IPv6 powered internet, obviously because of the lifeline that NAT has offered, the reality is that IPv4 has no place in the internet of things (IoT).
With the world population approaching 8 billion and the need to connect everything on the surface of the earth to the internet at an all-time high, relying on the 4.2 billion addresses available in IPv4 is like taking a knife to a gun fight. In this first post in the IPv6 routing series, I will share with us on how to implement RIP next generation (RIPng). While a lot of people would have preferred a name like RIP6, the network gods, after due consultation with the oracles, settled for RIP next generation. I kind of like how it sounds; next generation! Lol.
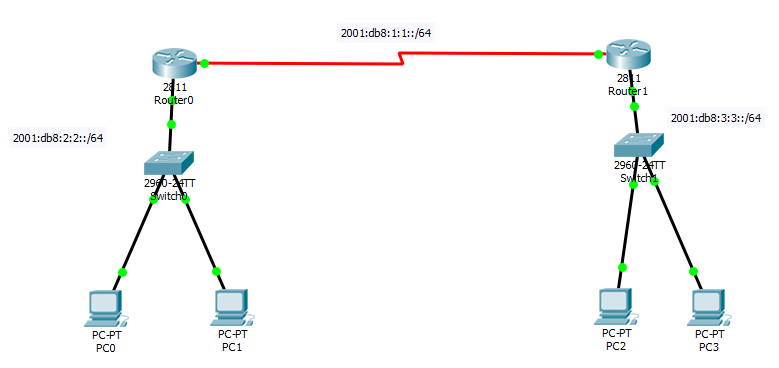
Okay, enough of this. Let’s design an IPv6 solution consisting of three networks powered by two Cisco 2811 routers, and demonstrate the implementation of RIPng. This exercise will, of course, be done using the Cisco Packet Tracer. So everyone is invited to participate.
On Router0
Router0(config)#ipv6 unicast-routing
Router0(config)#int s0/3/0
Router0(config-if)#clock rate 64000
Router0(config-if)#ipv6 add
Router0(config-if)#ipv6 address 2001:db8:1:1::1/64
Router0(config-if)#ipv6 rip timigate enable
Router0(config-if)#no shut
Router0(config-if)#int f0/0
Router0(config-if)#ipv6 add 2001:db8:2:2::1/64
Router0(config-if)#no shut
Router0(config-if)#ipv6 rip timigate enable
On Router1
Router1(config)#ipv6 unicast-routing
Router1(config)#int s0/3/0
Router1(config-if)#ipv6 add
Router1(config-if)#ipv6 address 2001:db8:1:1::2/64
Router1(config-if)#ipv6 rip timigate enable
Router1(config-if)#no shut
Router1(config-if)#int f0/0
Router1(config-if)#ipv6 add 2001:db8:3:3::1/64
Router1(config-if)#no shut
Router1(config-if)#ipv6 rip timigate enable
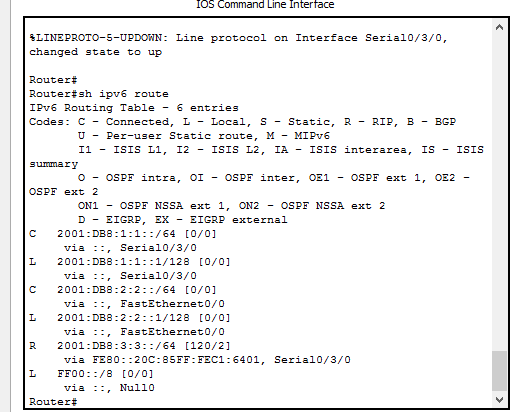
Read: How to configure redistribution between eigrp and RIP using Cisco Packet TracerAn important thing to note is that with RIPng, dynamic routing is enabled on participating interfaces as against the conventional way of doing it in IPv4 where the global routing command is used to initiate the routing process and the various networks to be advertised are entered. All I did to configure RIPng on the routers was enable RIPng on the interfaces whose networks I want advertised to the neighbor router. The word timigate was used to identify this particular instance of RIP.
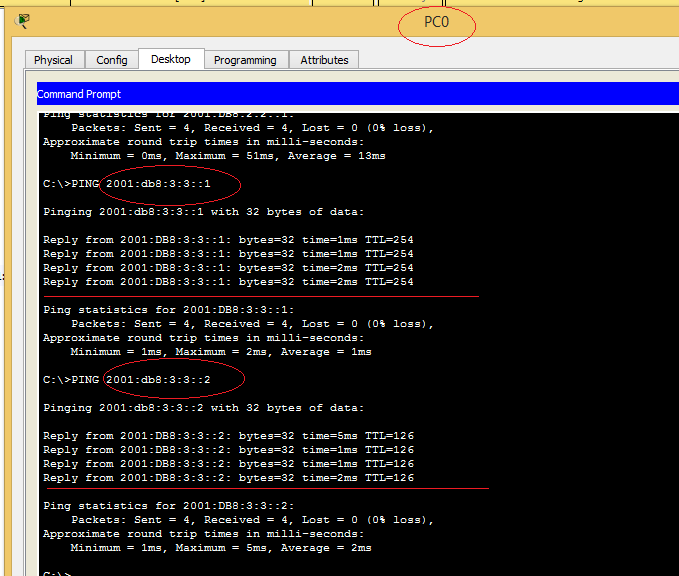
The IPv6 address 2001:db8:3:3::1 circled in the image above, is the Ipv6 address assigned to the f0/0 interface on Router1 while the IPv6 address 2001:db8:3:3::2 belongs to PC3.
If you enjoyed this tutorial, please subscribe to this blog to receive my posts via email. Also subscribe to my YouTube channel, like my Facebook page and follow me on Twitter.