
While the Cisco Packet Racer is unarguably one of the best applications ever developed to aid young network enthusiasts learn and master the acts of setting up and administering small to medium sized enterprise networks, the reality that GNS3 brings to network simulation is unparalleled. In this demonstration, I will share with us on GNS3 initial setup process.
As you advance from CCNA to CCNP where advanced configurations like bgp, EIGRP authentication, path selections, route-maps, OSPF virtual links, route tagging, etc, are done, you will discover that the Cisco Packet Racer can not handle these requirements. At this point, you have two options: get yourself some Cisco routers or GNS3. A lot of people at the CCNP level went with GNS3 because it is cheaper and gives access to limitless possibilities even though most people find it difficult setting it up. In this post, I will share with us how to set it up.
![]()
You may also like: a complete guide on how to set up Cisco Configuration Professional (CCP)
Downloading GNS3
The first step is to look for GNS3, download and install it. It is a free software created by a guy in France named Jeremy and his team. The community accepts free-willed donations from individuals to keep the project running. Go to gns3.com, create an account, the head to https://www.gns3.com/software/download to download the latest version of the software. GNS3 works with other software like wireshark, virtual box, etc. Any of the software not installed on your PC will be
installed.
installed.
Creating Project and Image folders
After you have successfully installed GNS3, you then need to set it up. To do this, you will need valid Cisco iOS for the following routers included in GNS3: c1700, c2691, c3600, c3745, c7200. After you have downloaded these ios files, save them to a folder on your computer (you can name the folder images). Create another folder and name it projects. This is where all your GNS3 projects will be stored.
Importing Project and Image folders into GNS3
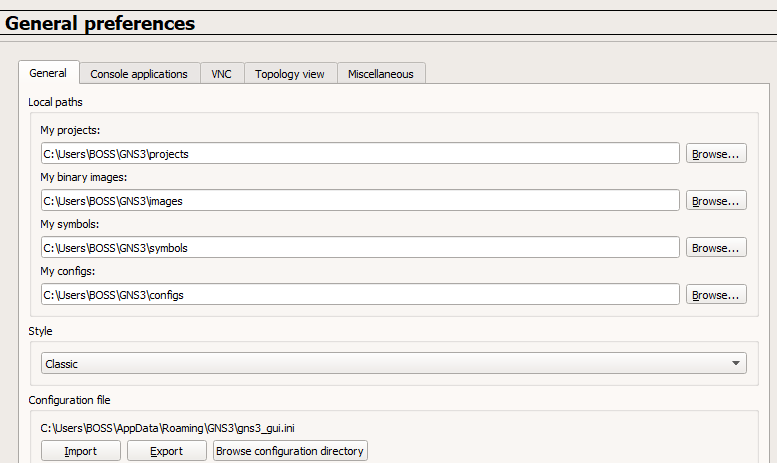
Next, click on edit, then preference. In the space under “my project” choose the folder named project you created earlier. For “my binary image”, choose the folder containing your ios images you downloaded earlier. Click apply and ok
Importing ios image into GNS3 routers
Next step is to import the ios images into their respective routers. Click on edit >> ios router >>, new >> check the box for ” run this ios router on my local computer” >> next >> check the box for “new image” and navigate to the folder where the ios image is stored, select the image. At this point, GNS3 will automatically detect the platform and all you need to to is click next, leave the memory at default 512 and click next (alternatively, you can click the link for minimum and maximum RAM requirement, add interfaces and click next, click on idle PC finder to calculate the idle PC value. This will make sure that dynamics, the engine behind, GNS3 does not consume the processor of the host computer. Once the idle PC value has been found and automatically applied, click on finish. Repeat this steps for all the platforms whose ios images you have. Once done, you are ready to use your GNS3
If you found it difficult, don’t worry as I will be making a video on this soon.