
This demonstration shows how to successfully implement OSPF on a network topology involving three Mikrotik routers. I will share some of the features of OSPF as well as the practical implementation of OSPF on Mikrotik routers.
The Open Shortest Path First is an industry standard routing protocol that supports equipment from different vendors. It is a link state routing protocol that supports variable length subnetmask (VLSM), manual route summarization, authentication, etc. It has a default administrative distance of 110 and uses cost to determine the shortest path to a destination network. Unlike other internal routing protocols, ospf keeps all possible routes to a destination network. This is why ospf is processor-intensive. Consider the network topology below:
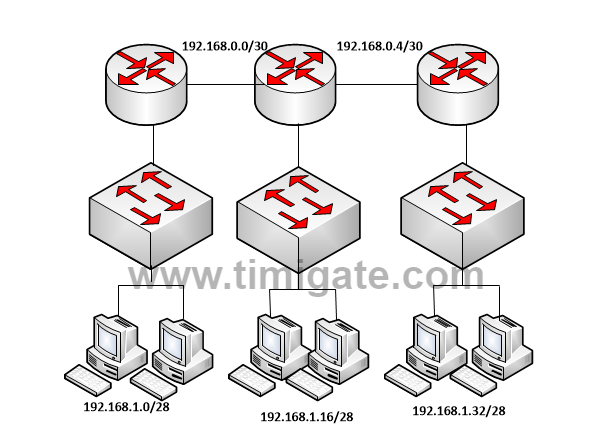
LAB Objective
The objective of this lab is to successfully implement OSPF on the above displayed network topology to provide full connectivity such that each router’s routing table is updated with ospf routes to all available destinations.
Configuring OSPF on Mikrotik routers
I will commence my implementation on router 1. First, I will assign IP addresses. See below:
On router 1:
/ip address
add interface=ether1 address=192.168.0.1/30 comment=”connection_to_router2”
add interface=ether2 address=192.168.1.1/28 comment=”LAN”
On router 2:
/ip address
add interface=ether1 address=192.168.0.2/30 comment=”connection_to_router1”
add interface=ether2 address=192.168.0.5/30 comment=”connection_to_router3”
add interface=ether3 address=192.168.1.17/28 comment=”connection_to_LAN”
On router 3:
/ip address
add interface=ether1 address=192.168.0.6/30 comment=”connection_to_router2”
add interface=ether2 address=192.168.1.33/28 comment=”LAN”
You may also like: Configuring a single-area OSPF for a network topology of three Cisco routers and five networks
Next step is the creation of loopback interfaces (bridges). This ensures the stability of OSPF since the loopback interfaces are always on. I will create bridges on all three routers. See below:
On router 1:
/interface bridge
add name=ospf-bridge comment=”OSPF loopback”
On router 2:
/interface bridge
add name=ospf-bridge comment=”OSPF loopback”
On router 3:
/interface bridge
add name=ospf-bridge comment=”OSPF loopback”
Next, I will assign IP addresses to the bridges created above.
On router 1:
/ip address
add interface=ospf address=172.16.16.1
On router 2:
/ip address
add interface=ospf address=172.16.16.2
On router 3:
/ip address
add interface=ospf address=172.16.16.3
Next, I will configure OSPF instances on all three routers.
You may also like: Configuring Cisco route redistribution between EIGRP and OSPF
OSPF instance configuration
Here, I will configure the loopback IP addresses assigned in the previous step as the ospf router IDs. See below:
On router 1:
/routing ospf instance
set default router-id=172.16.16.1
On router 2:
/routing ospf instance
set default router-id=172.16.16.2
On router 3:
/routing ospf instance
set default router-id=172.16.16.3
OSPF network advertisement
Now that the ospf instances have been established, I will advertise connected networks. See below:
On router 1:
/routing ospf network
add network=172.16.16.1 area=backbone comment=Loopback
add network=192.168.0.0/30 area=backbone comment=”connection_to_router2″
add network=192.168.1.0/28 area=backbone comment=”LAN”
On router 2:
/routing ospf network
add network=172.16.16.2 area=backbone comment=Loopback
add network=192.168.0.0/30 area=backbone comment=”connection_to_router1″
add network=192.168.0.4/30 area=backbone comment=”connection_to_router3″
add network=192.168.1.16/28 area=backbone comment=”LAN”
On router 3:
/routing ospf network
add network=172.16.16.3 area=backbone comment=Loopback
add network=192.168.0.4/30 area=backbone comment=”connection_to_router2″
add network=192.168.1.32/28 area=backbone comment=”LAN”
Verification
To verify if ospf is working as it should, we can use the following commands:
/routing ospf neighbor print
The command above shows routers that the local router has formed ospf neighbor relationships with. The next command is the command that displays routes learned via ospf. See below:
/routing ospf route print