
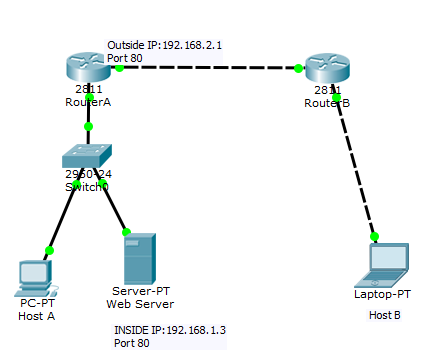
From the network topology, we have a web server that has been assigned a private IP address for security reasons.
The task is to configure router A to statically allow access to the web server on port 80 for all in-coming traffics to the public IP assigned to the router. In this demonstration, out ISP assigned public IP is 192.168.2.1 while the web server’s privately assigned IP is 192.168.1.3
Objective:
Our goal is to configure static NAT on the router in such a way that http requests to 192.168.2.1 from host B or any other host on the internet will be redirected to the web server. This will ensure that the IP of the Web server is not advertised to the internet.
Parameters:
Router A public IP: 192.168.2.1 (Yes, it is not a public IP. Just for demonstration purpose)
Router A’s private IP: 192.168.1.1
Web server’s IP 192.168.1.3
Protocol: TCP
Port number: 80
Configuration:
timigate(config)#ip nat inside source static tcp 192.168.1.3 80 192.168.2.1 80
timigate(config)#int f0/0
timigate(config-if)#ip nat outside
timigate(config-if)#int f0/1
timigate(config-if)#ip nat inside
Explanation:
>>The first statement simply instructs the router to allow http request to 192.168.2.1(the public IP on
the router) to be redirected to an inside source address, in this case 192.168.1.3. HTTP is a TCP protocol that makes use of port 80.
the router) to be redirected to an inside source address, in this case 192.168.1.3. HTTP is a TCP protocol that makes use of port 80.
>> Interface f0/0 is the interface connecting to the ISP and is named outside
>> Interface f0/1 connects to the LAN and is named inside interface.
You may also like: NetworkAddress Translation (NAT) configuration on a Cisco router, from start to finish.
Verification:
To verify the workings of this setup, we will open a web browser on host B and type in router A’s public IP. This should take us to the web server. On your packet Tracer, click on host B, go to desktop and click on web browser. Type in the IP of router A’s WAN interface and hit the enter key. The result should be as shown below:

This configuration was done, assuming that other basic configurations had been done. For a guide on the complete configuration required on both routers, from start to finish, see the output of show run command on both routers.
RouterA:
interface FastEthernet0/0
ip address 192.168.2.1
255.255.255.0
255.255.255.0
ip nat outside
duplex auto
speed auto
!
interface FastEthernet0/1
ip address 192.168.1.1
255.255.255.0
255.255.255.0
ip nat inside
duplex auto
speed auto
!
interface Vlan1
no ip address
shutdown
!
ip nat pool timigate
192.168.2.1 192.168.2.1 netmask 255.255.255.255
192.168.2.1 192.168.2.1 netmask 255.255.255.255
ip nat inside source list 1
pool timigate overload
pool timigate overload
ip nat inside source static
tcp 192.168.1.3 80 192.168.2.1 80
tcp 192.168.1.3 80 192.168.2.1 80
ip classless
ip route 192.168.3.0
255.255.255.0 192.168.2.2
255.255.255.0 192.168.2.2
!
ip flow-export version 9
!
!
access-list 1 permit
192.168.1.0 0.0.0.255
192.168.1.0 0.0.0.255
!
!
!
!
!
line con 0
!
line aux 0
!
line vty 0 4
login
!
!
!
end
RouterB:
interface FastEthernet0/0
ip address 192.168.2.2
255.255.255.0
255.255.255.0
duplex auto
speed auto
!
interface FastEthernet0/1
ip address 192.168.3.1
255.255.255.0
255.255.255.0
duplex auto
speed auto
!
interface Vlan1
no ip address
shutdown
!
ip classless
ip route 192.168.1.0
255.255.255.0 192.168.2.1
255.255.255.0 192.168.2.1
!
ip flow-export version 9
!
!
!
!
!
!
!
line con 0
!
line aux 0
!
line vty 0 4
login
!
!
!
end