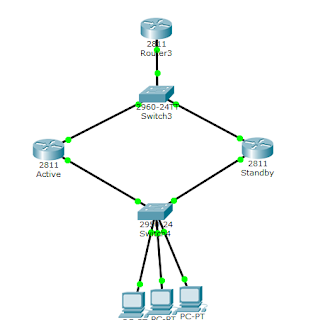
From the topology, we have a single ISP connection to our network with a /29 public subnet. To achieve fault tolerance, we have the link connected to a switch from where we have dual connections to two routers. The two routers may or may not be in the same building. If far apart, the connection will be established using fiber optic cables. The two routers are
further connected to the LAN switch via their f0/1 ports.
Implementation
ISP Router:
ISP(config)#int f0/0
ISP(config-if)#ip add 192.168.1.1 255.255.255.248
ISP(config-if)#no shut
ACTIVE Router
ACTIVE(config)#int f0/0
ACTIVE(config-if)#ip add 192.168.1.2 255.255.255.248
ACTIVE(config-if)#no shut
ACTIVE(config-if)#ip nat outside
ACTIVE(config-if)#int f0/1
ACTIVE(config-if)#ip add 192.168.2.1 255.255.255.0
ACTIVE(config-if)#no shut
ACTIVE(config-if)#ip nat inside
ACTIVE(config-if)#standby 1 ip 192.168.2.3
ACTIVE(config-if)#standby 1 priority 120
ACTIVE(config-if)#stabdby 1 preempt
ACTIVE(config-if)#exit
ACTIVE(config)#access-list 1 permit 192.168.2.0 0.0.0.255
ACTIVE(config)#ip nat pool active 192.168.1.2 192.168.1.2 netmask 255.255.255.248
ACTIVE(config)#ip nat inside source list 1 pool cisco overload
STANDBY Router
STANDBY(config)#int f0/0
STANDBY(config-if)#ip add 192.168.1.3 255.255.255.248
STANDBY(config-if)#no shut
STANDBY(config-if)#ip nat outside
STANDBY(config-if)#int f0/1
STANDBY(config-if)#ip add 192.168.2.2 255.255.255.0
STANDBY(config-if)#no shut
STANDBY(config-if)#ip nat inside
STANDBY(config-if)#standby 1 ip 192.168.2.3
STANDBY(config-if)#exit
STANDBY(config)#access-list 1 permit 192.168.2.0 0.0.0.255
STANDBY(config)#ip nat pool standby 192.168.1.3 192.168.1.3 netmask 255.255.255.248
STANDBY(config)#ip nat inside source list 1 pool cisco overload
Note: I used the “public” IP on each router as its nat pool. This makes it possible for the ISP router to know where the traffics are coming from and effectively reply accordingly.


