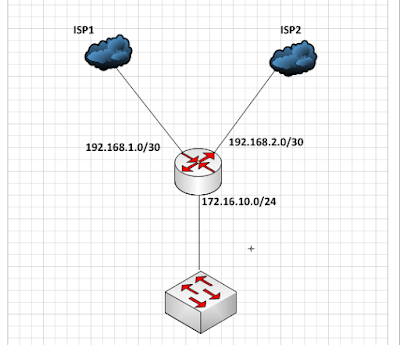
Assign IP addresses
/ ip address
add address=172.16.10.1/24 network=172.16.10.0 broadcast=172.16.10.255
interface=LAN
add address=192.168.1.2/30 network=192.168.1.0 broadcast=192.168.1.3
interface=ISP1
add address=192.168.2.2/30 network=192.168.2.0 broadcast=192.168.2.3
interface=ISP2
Set default gateways for unmarked connections
/ip route
add dst-address=0.0.0.0/0 check-gateway=ping gateway=192.168.1.1,192.168.2.1
Nat rules for traffics out both ISPs connections
/ip firewall nat
add action=masquerade chain=srcnat comment=”ISP1″ out-interface=ether1
add action=masquerade chain=srcnat comment=”ISP2″ out-interface=ether2
Because we want to make sure that connections coming in through one ISP, leaves via the same ISP, we must identify and keep these connections separate. We will use connection mark the connections as they coming via the ISPs and use route mark them as they leave. See below.
Mark inbound connections
/ip firewall mangle
add action=mark-connection chain=input comment=”ISP1_Inbound” in-interface=ether1 new-connection-mark=”ISP1_Inbound”
add action=mark-connection chain=input comment=”ISP2_Inbound” in-interface=ether2 new-connection-mark=”ISP2_Inbound”
Use Route Mark for outbound connections
add action=mark-routing chain=output comment=”ISP1_Outbound” connection-mark=”ISP1_Inbound” new-routing-mark=”ISP1_Outbound”
add action=mark-routing chain=output comment=”ISP2_Outbound” connection-mark=”ISP1_Inbound” new-routing-mark=”ISP2_Outbound”
Using the route marks created above, we need to set route-marks that will identify various connections. Connections with destination addresses that are NOT from the LAN addresses will be identified and based on the route-mark, used to classify the ratio at which connections should be established out both ISP links. See below:
Setting route marks for LAN connections
/Ip firewall mangle
add action=mark-routing chain=prerouting comment=”LAN load balancing 2-0″ \
dst-address-type=!local in-interface=ether3 new-routing-mark=\
“ISP1_Outbound” passthrough=yes per-connection-classifier=\
both-addresses-and-ports:2/0
add action=mark-routing chain=prerouting comment=”LAN load balancing 2-1″ \
dst-address-type=!local in-interface=ether3 new-routing-mark=\
“ISP2_Outbound” passthrough=yes per-connection-classifier=\
both-addresses-and-ports:2/1
Finally, we create default routes to make use of the route-marks above to load-balance across both ISP. These default routes will ensure that traffics coming in via an ISP to leave via the same. See below:
Setting default routes
/ip route
add distance=1 gateway=192.168.1.1 routing-mark=”ISP1_Outbound”
add distance=1 gateway=192.168.2.1 routing-mark=”ISP2_Outbound”
The configuration above will ensure that traffics are load-balanced across both ISP connections by making sure that connection that are initiated via an ISP remains with that ISP except the link fails, in which case the connection will be re-established using the alternate link. Connections that are not marked, will make use of the first configured default route which makes ISP1 the preferred connection while ISP2 is the backup route.

