This demonstration shows how to configure destination NAT on Mikrotik router to map a group of users to a public IP address instead of the conventional masquerade rule. With this method, network administrators can configure destination NAT on Mikrotik routers to allow users access the internet using a public IP address that is not associated with any interface on the router. This method helps improve network security by making sure that the public IP that is seen on the internet is not accessible by anyone since it is not assigned to any interface on the router. It also ensures that violations are traceable to culpable users easily.
Why would you want to do this? This method is suitable for a networks with so many users that need to
access the internet. Having everyone configured to use a single public IP address poses a lot of problems and assigning public IPs to devices that do not need to be managed remotely is really not a wise idea considering the security risk.
When too many users are on figured to access the internet using the same public IP, a violation by a user can result in a denial of service to all the users. For instance, if the IP becomes blacklisted, all the users will have problems irrespective of who among the users was involved in mail spamming.
To guard against issues like the one stated above, network administrators need to configure network address translation to either NAT a customer to a public IP or a group of customers to a public IP. The public IP will not be assigned to any interface on any of the customer devices. This solution is only suitable for customers whose devices need not be managed remotely.
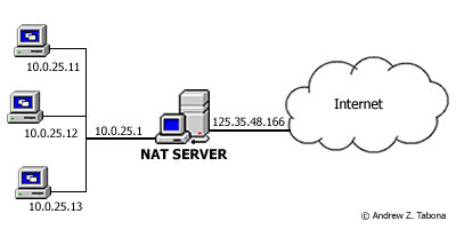
The configuration requirement for this demonstration is simple and straight forward. What we need to do is create a source nat to match the source IP address from the customers’ LAN and translate to the public IP as they make their way to the internet. See commands below:
/ip firewall nat add chain=srcnat src-address=172.26.16.0/24 action=src-nat to-addresses=197.255.102.124 out-interface=ether1
From the command above, 172.26.16.0/24 is the block of private IP while 197.255.102.24 is the public IP that will be seen when users from the LAN access the internet. The beautiful thing here is that 197.255.102.24 is not assigned to any interface on the device and thus inaccessible from the internet. This keeps the network secured while making sure that any violation will easily be traceable to the customer.