While it is clear that a lot of people have written “things” on the topic under consideration, I want to write from an experienced professional’s perspective. I want to give a step-by-step, detailed explanation on how to set up a Cisco linksys. Whatever you read on this blog, has been tested in an lab environment.
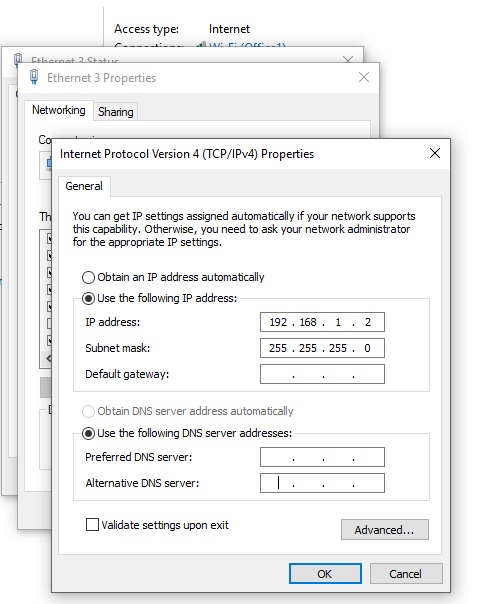
Linksys routers come preconfigured with a default class C IP address of 192.168.1.1/24 and a default username and password of “admin admin”. This means that for you to configure the router, you must first change the IP address on your computer to an IP from the same network as the router. For example, 192.168.1.2 with a subnetmask of 255.255.255.0.
Connect a straight through cable from the LAN port of your computer to any of the LAN ports on the Linksys router.(ports 1 to 4). Open a web browser and type in the IP address 192.168.1.1 into the URL field and hit the enter key.
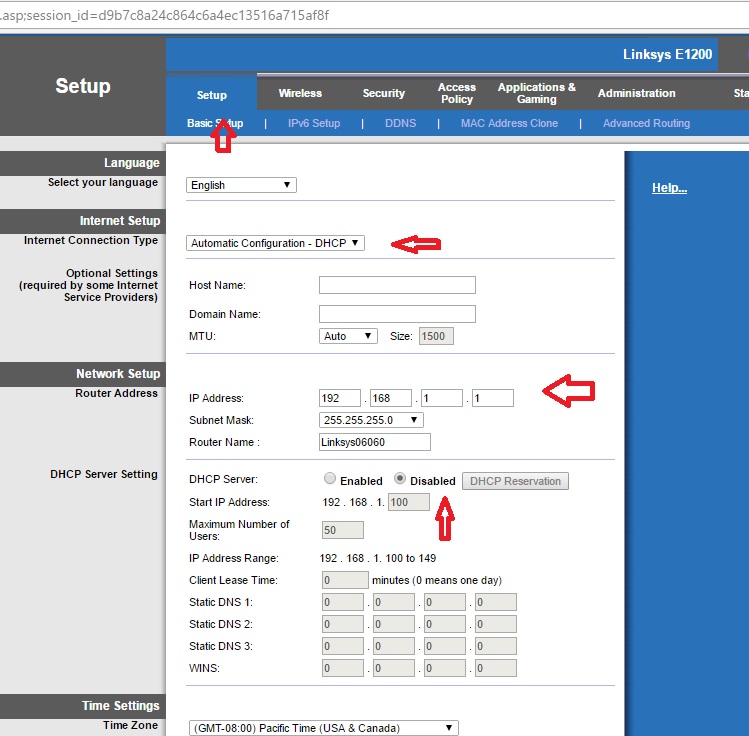
Once you have logged on to the router as shown above, click on setup, basic setup. Here, you can choose your preferred language. The DHCP tab allows you to obtain IP address automatically from your ISP. If your ISP device is not configured as a dhcp server, you will have to click on the arrow beside dhcp and choose static. While there, enter the IP address, subnetmask, default gateway, and DNS given to you by your ISP as shown in the image below
The next thing is to change the LAN address to an address that suits your network plan. If you don’t have a reason for doing this, I suggest you leave it at the default IP address. To change it, just erase the default IP of 192.168.1.1 and replace it with any IP from any network, be it class A,B or C.
Next, we enable or disable DHCP for our LAN. Most of the times, you will have to enable dchp. That makes your wireless router a dhcp server, giving it the ability to lease IPs to wireless clients that will connect to your network. The only reason you have to disable this is when you want to configure your wireless router as a bridge. That means you have a dhcp server somewhere on your network. This could be another router that has a direct connection to your ISP. In that case the cable connecting your wireless router to your other router will be plugged to any of the LAN ports and not to the WAN. This way, your wireless router becomes a wireless bridge that enables wireless client to obtain IP address from the dhcp server which could be a router on your network.
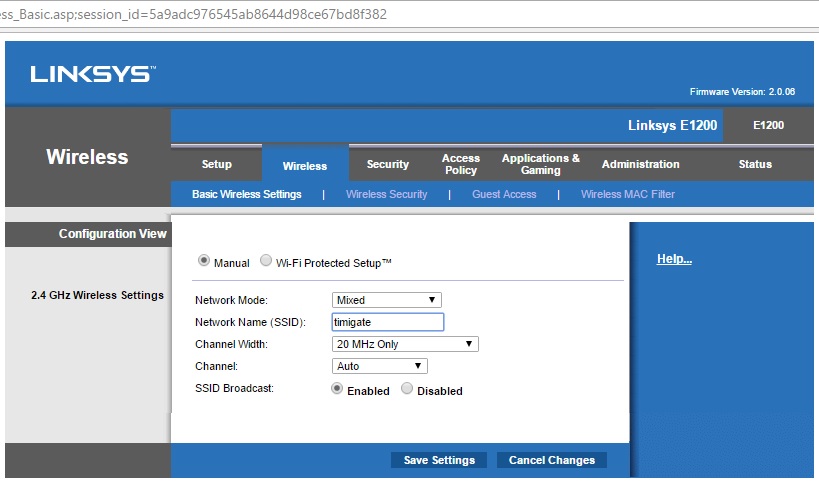
Click on the wireless tab as shown above, click on manual to set it up manually, leave the network mode at “mixed”so that wireless clients with different wireless cards can connect. But if you want only a specific type of wireless clients to connect, go ahead and set it to the network mode of the wireless cards in those clients. Enter your service set identifier (SSID), choose your preferred channel width but bear in mind that the bigger the channel width the more susceptible your network will be to interference. Most of the time, we leave it at 20MHz. There are three non-overlapping channels under the 2.4GHz frequency. These are channels 1,6, and 11. Set your channel to any of these provided no wireless router is already broadcasting on it. If you don’t know how to scan fro frequency, just leave it at auto. The router will automatically adjust its channel.
Still under the wireless tab, click on wireless security, the security mode will show “disabled”, click on the arrow beside it and choose WPA2 personal or any other one you prefer, enter the password for your wifi making sure it is at least eight character long. The stronger your password, the better. Click on save changes and you will be good to go.
Thanks for reading this and don’t forget to like our page.