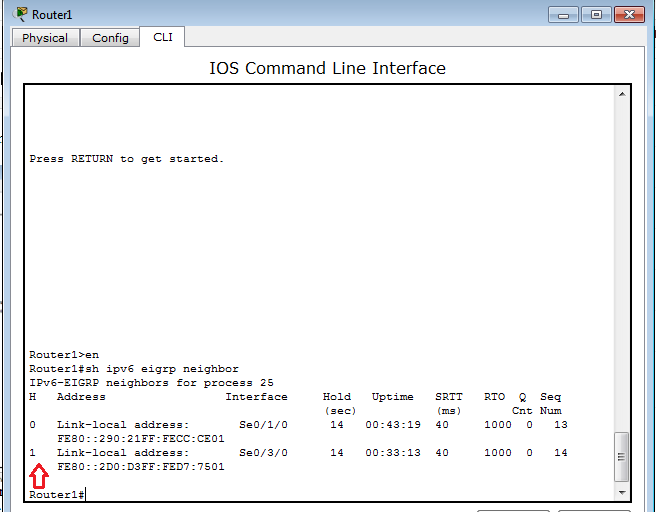
Router>en
Router#conf t
Router(config)#Hostname Router0
Router0(config)#ipv6 unicast-routing
Router0(config)#ipv6 router eigrp 25 (puts router0 on eigrp autonomous system 25)
Router0(config-rtr)#eigrp router-id 1.1.1.1
Router0(config-rtr)#no shut
Router0(config-rtr)#exit
Router0(config)#int s0/3/0
Router0(config-if)#ipv6 add 2001:db8:0::1/64
Router0(config-if)#description connects to Router1
Router0(config-if)#ipv6 eigrp 25 (enables ipv6 eigrp 25 on this interface)
Router0(config-if)#no shut
Router0(config-if)#int f0/0
Router0(config-if)#ipv6 add 2001:db8:1::1/64
Router0(config-if)#description connects to LAN
Router0(config-if)#ipv6 eigrp 25 (enables ipv6 eigrp 25 on this interface)Router0(config-if)#no shut
Router>en
Router#conf t
Router(config)#Hostname Router1
Router1(config)#ipv6 unicast-routing
Router1(config)#ipv6 router eigrp 25 (puts router1 on eigrp autonomous system 25)
Router1(config-rtr)#eigrp router-id 1.1.1.2
Router1(config-rtr)#no shut
Router1(config-rtr)#exit
Router1(config)#int s0/1/0
Router1(config-if)#clock rate 64000
Router1(config-if)#ipv6 add 2001:db8:0::2/64
Router1(config-if)#description connects to Router0
Router1(config-if)#ipv6 eigrp 25 (enables ipv6 eigrp 25 on this interface)
Router1(config-if)#no shut
Router1(config)#int s0/3/0
Router1(config-if)#clock rate 64000
Router1(config-if)#ipv6 add 2001:db8:1::1/64
Router1(config-if)#description connects to Router2
Router1(config-if)#ipv6 eigrp 25 (enables ipv6 eigrp 25 on this interface)
Router1(config-if)#no shut
Router1(config-if)#int f0/0
Router1(config-if)#ipv6 add 2001:db8:3::1/64
Router1(config-if)#description connects to LAN
Router1(config-if)#ipv6 eigrp 25 (enables ipv6 eigrp 25 on this interface)Router1(config-if)#no shut
Router>en
Router#conf t
Router(config)#Hostname Router2
Router2(config)#ipv6 unicast-routing
Router2(config)#ipv6 router eigrp 25 (puts router2 on eigrp autonomous system 25)
Router2(config-rtr)#eigrp router-id 1.1.1.3
Router2(config-rtr)#no shut
Router2(config-rtr)#exit
Router2(config)#int s0/3/0
Router2(config-if)#ipv6 add 2001:db8:1::2/64
Router2(config-if)#description connects to Router1
Router2(config-if)#ipv6 eigrp 25 (enables ipv6 eigrp 25 on this interface)
Router2(config-if)#no shut
Router2(config-if)#int f0/0
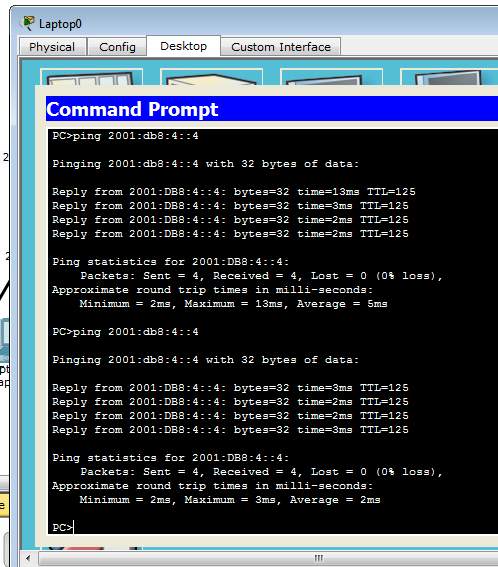
Router2(config-if)#ipv6 add 2001:db8:4::1/64
Router2(config-if)#description connects to LAN
Router2(config-if)#ipv6 eigrp 25 (enables ipv6 eigrp 25 on this interface)
Router2(config-if)#no shut
Optimizing Metro Ethernet segments with jumbo MTU (Maximum Transmission Unit) can significantly enhance network performance…
MikroTik's SwitchOS is an operating system specifically designed for their line of network switches. It…
A properly configured VRRP setup does not only track device uptime but also tracks connection…
Network Address Translation (NAT) is a technique used in networking to map private IP addresses…
In the ever-evolving landscape of networking technologies, the demand for efficient and scalable solutions has…
Setting up Multi-Area OSPF (Open Shortest Path First) on Mikrotik routers involves a few steps.…